About Recipes Restaurants FAQ My Kitchen My Kitchen

Sunday, May 3, 2009

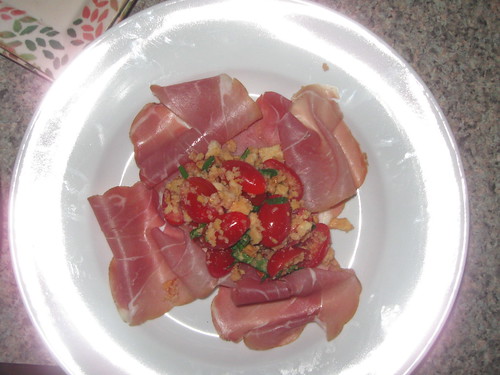
Fresh, simple, pretty prosciutto

Last night we had steaks for dinner with grilled ramps and some potatoes. I wanted to make a first course with a little pizazz (and not a lot of effort). I found a recipe in Neil Perry's Good Food for Prosciutto with tomato and bread salsa. It looked pretty and easy so I gave it a whirl. It was delicious and very eye-catching. I'll definitely make this again for a dinner party.

As I so often do, I made a few modifications to the recipe. My version follows. I will note that Chef Perry called for parsley and not basil and sourdough breadcrumbs. Lacking sourdough, I had some pocketless Greek pita so I dried one in the oven and then crushed it with my handy rolling pin.


Prosciutto with Tomato bread salsa

Serve 2 (can easily be increased for more people)
  • 8-10 paper thin slices of prosciutto
  • 1/2 pint cherry or grape tomatoes, cut in half
  • about 5 basil leaves
  • 1/2 cup breadcrumbs (use homemade - store bought are too fine. you want just a little chunkiness)
  • 1 Tbsp. tomato juice (just squeeze a chunk of tomato)
  • Red wine vinegar
  • Extra Virgin olive oil
  • sea salt
  • fresh ground black pepper

Arrange the prosciutto on two plates. In a bowl, combine the tomatoes, breadcrumbs, basil and tomato juice. Add a splash of red wine vinegar and a lite drizzle of olive oil. Stir to combine, then add salt and pepper to taste. Scoop the tomato salsa into the center of each plate.

Couldn't be any easier!

Wednesday, April 29, 2009

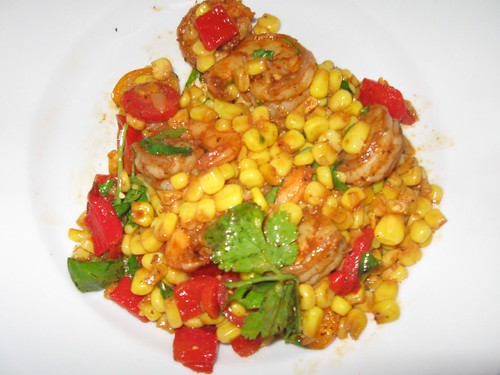
Quick and easy shrimp

A recent Christmas gift from my mom included a signed copy of Catherine Walthers' Raising the Salad Bar. I have to admit it's not a cookbook I've used frequently, but this next recipe is one that will make me give the book much more than another glance. The writer hails from Martha's Vineyard, one of my favorite spots. The photos are by a famous Vineyard photographer, Alison Shaw. The book really is beautiful. It combines fresh ingredients from local farms, and this recipe is no exception. In the foreword to the recipe, Walthers explains that she uses fresh produce from Morning Glory Farms. Having vacationed on MV for many years, this place really does have the best corn, among other things.

As I usually do, I made some modifications. This mixture of corn and shrimp can be served warm or cold. It's great as a main course or serve it with a hot grilled steak for something special. Oh, and it takes just about no time to prepare...


Cajun Shrimp and Corn Salad with Lime-Chile Dressing
adapted from Raising the Salad Bar by Catherine Walthers

  • 1 1/4 lbs. shrimp, peeled and deveined
  • 2-3 tsp. Cajun seasoning
  • 2 Tbsp. olive oil
  • 1 clove minced garlic
  • 1/8 tsp. Cayenne (more if you like it HOT!)
  • 3 cups of corn kernels
  • 1/2 pint cherry tomatoes, halved
  • 1 roasted red bell pepper, diced
  • 2 Tbsp. fresh minced cilantro

For the dressing

  • 2 Tbsp. fresh lime juice
  • 1 tsp. ancho Chile powder
  • 1/2 Tbsp olive oil
  • Salt and pepper

To make the dressing, combine all ingredients and whisk.

Combine the shrimp and Cajun seasoning in a bowl. I prefer Pensey's Cajun seasoning, but use any kind you have on hand. Heat the oil in a large skillet. Add the shrimp and cook for a few minutes. Add the garlic and cayenne and cook until the shrimp are cooked through. Add the corn and allow to cook for a few minutes. (Fresh corn kernels would be best here, but I made this in the Spring so I used fresh frozen. I let is cook until the liquid cooked off but the corn wasn't mushy.

Stir in the red pepper and tomatoes and allow to warm though. Remove from heat, add the dressing and cilantro and stir to combine. Add salt and pepper to taste. Add more lime juice if desired. Serve warm or at room temperature.

For a variation, consider basil or parsley in place of the cilantro. Fresh chopped red or green pepper could easily replace the roasted as well. Another thing I love about this recipe is its vibrant color. Yellow corn, red tomatoes, green herbs, and the pink shrimp make it very eye-catching. It'd be a great picnic dish or an easy side for company... It definitely raises the bar on salads. Hmmm, I wonder what else the book has to offer...

Wednesday, April 22, 2009

Restaurant review: Ginger Sushi

Sushi has not always been one of my favorite foods. In fact until I ventured out with my former roommates from college after we graduated, I wouldn't touch the stuff. Now, my husband and I are on a first name basis with the people at Ginger Sushi in Fanwood, NJ. It helps that this little spot is only about a minute from our house, but even if I lived farther away, I'd drive for this sushi.

Over the past two years, we've tried a number of menu items. They offer an extensive sushi menu as well as hot Japanese dishes from the kitchen. For starters, the avocado salad is a classic with the creamy ginger dressing. Their miso soup is also very good.

For the more adventurous, try the garlic storm. You'll smell it about a mile away. Thin slices of raw red snapper are arranged on a plate and then a brilliant mix of hot olive oil and garlic are poured over it. The hot oil cooks the fish just a tad and the garlic transforms it into something sublime. There's also a seared tuna appetizer with a special sauce that's amazing. The chef lightly sears the tuna and then smothers it with a sauce that has onion, ginger, garlic, sesame oil, and some other goodies. I would eat the sauce with a spoon given the chance.

For sushi, we tend to stick with the rolls. They offer a number of different tiers - regular rolls are just that: a number of fish and veggie options. Simple things like spicy tuna and salmon avocado. Try the spicy shrimp. Yum!

The next level includes shrimp tempura rolls, Philadelphia rolls and other favorites.

But turn the page. This is what it's all about. The Ginger special rolls are 10 piece rolls and each is practically a meal in itself. Two of these and a couple of spicy shrimp rolls mean dinner for me and Jeff. Spice-fiends that we are, we almost always choose rolls with spicy something or other. The Spicy girl has spicy tuna and spicy salmon inside and fresh tuna and salmon on the outside. Delish! My favorite of late is the Spicy Crunchy Hamachi roll: inside is spicy yellowtail, avocado and cucumber and outside is fresh yellotail and crunch with a nice drizzle of spicy sauce. The Jumbo Spider roll is also always delicious - the softshell crab is always cooked to perfection. Another new favorite is the S.T. roll. This one is defined by a unique outside of lightly seared tuna - Chef Kim sears it with a blowtorch and then wraps it around the roll. Yum!

We're usually too full for dessert, but we do love the special citron tea they offer. It's a refreshing fruity drink that's as good as any dessert!

Ginger sushi is BYO (note well, if you have an extra sip of wine in your bottle, offer Chef Kim a glass!)If you live in the Fanwood area and like sushi - go see Mr. Kim at Ginger Sushi. It's always fresh and always delicious. And did I mention that they usually give you a sample of their signature fried California roll and the meal ends with a yummy moshi ice cream and fresh orange sections?


Ginger Sushi on Urbanspoon

If it's good enough for the princess of Thailand...


...it's definitely good enough for me and my husband (on a rainy Wednesday night). Regular readers will not be surprised to learn that I once again turned to the culinary wonder that is the Bistro Laurent Tourondel cookbook. This book simply does not disappoint. (and how do the months go by without making a visit to one of Chef Tourondel's restaurants???) This time I opted for the Lemongrass Rock Shrimp Risotto. Why not? We love risotto, we love shrimp, and we love Thai food. This one had to be good... and it was!


The intro for the recipe explains that Chef Tourondel first prepared it for the Princess of Thailand while he was working at the Four Seasons Bangkok. Not bad! It was a bit involved so I made the sauce a day ahead, right to the point of straining it, then I covered it with plastic wrap and put it in the fridge overnight. I didn't have rock shrimp so I used jumbo shrimp. The combination of flavors and textures were simply delightful. Madras curry powder, green curry paste, lemongrass, ginger, garlic, Thai Basil. YUM! You can find the complete recipe online: Lemongrass Rock Shrimp Risotto. Don't be intimidated - you might have to swing by an Asian market for a few ingredients, but it's well worth the trip.


I did make a few modifications. I cut the sauce in half. And instead of 2 cups of Arborio, I used 1 1/2. I also stirred the chopped Thai basil into the risotto to bring out the flavor a bit more. To serve, I scooped the risotto into the middle of the plate and then ladled the sauce around it.


This makes 9 recipes I've made from this cookbook and we have loved everyone. Who told Chef Tourondel exactly what we like??? Or maybe it was just my mother-in-law who had a keen sense for that - after all she gave me the book for Christmas.


Now I'm off to give the book another flip through to find my next adventure. In the meantime, tomorrow at our house, leftover risotto!

Sunday, April 19, 2009

Last Supper #15: Tetsuya Wakuda

Chef Tetsuya Wakuda of Sydney's famed Tetsuya's had a simple wish for his last supper: tuna, many ways. In my world, many became 3. I made 3 courses using super fresh sashimi grade tuna that I found at Whole Foods.

Course #1: homemade sushi. I made tune rolls with avocado and cucumber. I made a little spicy sauce with some mayo and sriracha. These were good, but I think I'll keep going to Ginger for my sushi. Mr. Kim just does it better.


Course#2: Tetsuya's own recipe for tuna with goat cheese. Sounds weird, but it was pretty tasty. Jeff enjoyed it more than I did. The presentation was very pretty.

Course#3: Tyler's ultimate tuna. I saw the episode on the Food Network and I had to make this dish. The tuna steaks were grilled rare and served with oven roasted vine tomatoes, a white bean puree, olive tapenade and arugula. So many of my favorite things coming together on one plate, but I have to say it fell a little flat. Maybe it was me, but something just wasn't working for me. (Maybe preparing 3 tuna courses just got to be a bit much that night!!!)

All in all this was a good meal but not really one I'd repeat. It does mark #15 on Project Last Supper. 25 more to go. Up next: Jonathan Waxman and some spring lamb!

Saturday, April 11, 2009

Calcots: Scallions attain perfection

When we were in Barcelona last Spring we were lucky enough to be there at just the right time to try Calcots - grilled spring onions with Romesco. I had nearly forgotten how good they tasted until last week when Jeff and I had lunch at Casa Mono - the Mario Batali-owned tapas restaurant near Union Square. At Casa Mono, they used simple scallions served with Romesco. Two things are for sure: 1) scallions taste amazing grilled and 2) Mario Batali can do no wrong. If you ever get the chance, try this restaurant. Adorable and the food is fantastic. But back to the scallions...

We enjoyed them so much I was determined to make them at home. I flipped thru numerous cookbooks and found several recipes for Romesco. The Barbecue Bible even had one for grilled spring onions with Romesco. I followed Steven Raichlen's method for grilling the scallions, but for the Romesco, I turned to another of our favorites: Neil Perry. I made a few modifications, so here's my version. (Oh, by the way, this makes a lot of sauce so either make it for a crowd, have it a few times, or cut the recipe down...)

Grilled Scallions with Romesco
  • Scallions (figure one good sized bunch per person. they cook down quite a bit)
  • A little olive oil
  • Sea salt or kosher salt

For the Romesco:
  • 6 Tbsp. Extra Virgin Olive oil, divided
  • 1/2 of a fresh red chili (about 4 inches in length) or use a few small ones, split and seeds removed
  • 4 garlic cloves, halved lengthwise
  • 1 slice Italian style bread, roughly chopped
  • 1/2 cup blanched almonds
  • 2 roasted red peppers, peeled and seeded
  • 2 vine-ripened tomatoes, peeled, seeds removed and chopped
  • 1 Tbsp. Sherry vinegar
  • sea slat and freshly ground pepper

To peel the tomatoes, cut a cross in the flat end of each and cut out the woody core. Dunk them for 10 seconds in boiling water and then immerse in an ice bath. This makes the skins peel easily. Then cut them open and remove the seeds.

You can use prepared orasted red peppers or make your own. I make them by sticking a pepper on a skewer and setting them over the flame of my gas stove and turning it until the skin is black all over. Use the same method on a grill. Once the skin is black, drop them into a brown paper bag and roll the top down. Allow to steam until cooled, them wipe away the black skin and discard the stem and seeds.

To make the sauce, heat 3 Tbsp. olive oil in a pan over medium heat. Add the chilli, garlic, bread and almonds and cook until the bread and almonds are golden. Cool slightly then procees the mixture in a food processor with the red pepper and tomatoes. I pulsed it a few times to keep the sauce a little chunky. Wth the motor running, drizzle in the remaining olive oil. Stir in the vinegar and add salt and pepper to taste.

To make the scallions, trim the end of the scallions slightly. Brush them all over with a little olive oil and sprinkle them with salt. Grill, turning them often until they have just a few grill marks. You want a little char but not a lot! And these little guys can burn quick so watch them carefully!

Remove them from the grill and wrap them in a triple layer of paper towels. Let them steam for about 8-10 minutes in the paper towels. (I stuck them in a warm oven to keep them from cooling). To serve, discard the paper towels and serve them on a platter with the Romesco on the side. The Romesco should be served room temperature.

Tuesday, March 31, 2009

Daring Bakers: Lasagne of Emilia Romana


The Daring Bakers came up with a great recipe this month: Lasagne - homemade spinach pasta sheets layered with bechamel and meaty ragu and more than a touch of fresh grated Parmigiano Reggiano. The March 2009 challenge is hosted by Mary of Beans and Caviar, Melinda of Melbourne Larder and Enza of Io Da Grande. They have chosen Lasagne of Emilia-Romagna from The Splendid Table by Lynne Rossetto Kasper as the challenge.
In the process, I also found a new use for my many wooden spooons. Stuck in the oven door, they become an impromptu rack for drying pasta sheets.


Here's the rather lengthy recipe, but don't be scared. You can make the sauces ahead. And I also used my pasta attachment to roll out the sheets. (The red sauce in the pictures is an addition of a little homemade marinara that I made to serve the lasagne over - it gave it nice tomato-y bite)
Lasagne of Emilia-Romagna (Lasagne Verdi al Forno)(Serves 8 to 10 as a first course, 6 to 8 as a main dish)
Preparation Time: 15 minutes to assemble and 40 minutes cooking time

10 quarts (9 litres) salted water
1 recipe Spinach Pasta cut for lasagna (recipe follows)#1
1 recipe Bechamel Sauce (recipe follows)#2
1 recipe Country Style Ragu (recipe follows)#3
1 cup (4 ounces/125g) freshly grated Parmigiano-Reggiano

Method
Working Ahead:The ragu and the béchamel sauce can be made up to three days ahead. The ragu can also be frozen for up to one month. The pasta can be rolled out, cut and dried up to 24 hours before cooking. The assembled lasagne can wait at room temperature (20 degrees Celsius/68 degrees Fahrenheit) about 1 hour before baking. Do not refrigerate it before baking, as the topping of béchamel and cheese will overcook by the time the center is hot.

Assembling the Ingredients:Have all the sauces, rewarmed gently over a medium heat, and the pasta at hand. Have a large perforated skimmer and a large bowl of cold water next to the stove. Spread a double thickness of paper towels over a large counter space. Preheat the oven to 350 degrees Fahrenheit (180 degrees Celsius). Oil or butter a 3 quart (approx 3 litre) shallow baking dish.

Cooking the Pasta:Bring the salted water to a boil. Drop about four pieces of pasta in the water at a time. Cook about 2 minutes. If you are using dried pasta, cook about 4 minutes, taste, and cook longer if necessary. The pasta will continue cooking during baking, so make sure it is only barely tender. Lift the lasagne from the water with a skimmer, drain, and then slip into the bowl of cold water to stop cooking. When cool, lift out and dry on the paper towels. Repeat until all the pasta is cooked.

Assembling the Lasagne: Spread a thin layer of béchamel over the bottom of the baking dish. Arrange a layer of about four overlapping sheets of pasta over the béchamel. Spread a thin layer of béchamel (about 3 or 4 spoonfuls) over the pasta, and then an equally thin layer of the ragu. Sprinkle with about 1&1/2 tablespoons of the béchamel and about 1/3 cup of the cheese. Repeat the layers until all ingredients are used, finishing with béchamel sauce and topping with a generous dusting of cheese.

Baking and Serving the Lasagne:Cover the baking dish lightly with foil, taking care not to let it touch the top of the lasagne. Bake 40 minutes, or until almost heated through. Remove the foil and bake another 10 minutes, or until hot in the center (test by inserting a knife – if it comes out very warm, the dish is ready). Take care not to brown the cheese topping. It should be melted, creamy looking and barely tinged with a little gold. Turn off the oven, leave the door ajar and let the lasagne rest for about 10 minutes. Then serve. This is not a solid lasagne, but a moist one that slips a bit when it is cut and served.

#1 Spinach Egg Pasta (Pasta Verde)
Preparation: 45 minutes
Makes enough for 6 to 8 first course servings or 4 to 6 main course servings, equivalent to 1 pound (450g) dried boxed pasta.
2 jumbo eggs (2 ounces/60g or more)
10 ounces (300g) fresh spinach, rinsed dry, and finely chopped; or 6 ounces (170g) frozen chopped spinach, defrosted and squeezed dry
3&1/2 cups (14 ounces/400g) all purpose unbleached (plain) flour (organic stone ground preferred)

Working by Hand:
Equipment
A roomy work surface, 24 to 30 inches deep by 30 to 36 inches (60cm to 77cm deep by 60cm to 92cm). Any smooth surface will do, but marble cools dough slightly, making it less flexible than desired.
A pastry scraper and a small wooden spoon for blending the dough.
A wooden dowel-style rolling pin. In Italy, pasta makers use one about 35 inches long and 2 inches thick (89cm long and 5cm thick). The shorter American-style pin with handles at either end can be used, but the longer it is, the easier it is to roll the pasta.Note: although it is not traditional, Enza has successfully made pasta with a marble rolling pin, and this can be substituted for the wooden pin, if you have one.
Plastic wrap to wrap the resting dough and to cover rolled-out pasta waiting to be filled. It protects the pasta from drying out too quickly.
A sharp chef’s knife for cutting pasta sheets.
Cloth-covered chair backs, broom handles, or specially designed pasta racks found in cookware shops for draping the pasta.

Mixing the dough:
Mound the flour in the center of your work surface and make a well in the middle. Add the eggs and spinach. Use a wooden spoon to beat together the eggs and spinach. Then gradually start incorporating shallow scrapings of flour from the sides of the well into the liquid. As you work more and more flour into the liquid, the well’s sides may collapse. Use a pastry scraper to keep the liquids from running off and to incorporate the last bits of flour into the dough. Don’t worry if it looks like a hopelessly rough and messy lump.

Kneading:
With the aid of the scraper to scoop up unruly pieces, start kneading the dough. Once it becomes a cohesive mass, use the scraper to remove any bits of hard flour on the work surface – these will make the dough lumpy. Knead the dough for about 3 minutes. Its consistency should be elastic and a little sticky. If it is too sticky to move easily, knead in a few more tablespoons of flour. Continue kneading about 10 minutes, or until the dough has become satiny, smooth, and very elastic. It will feel alive under your hands. Do not shortcut this step. Wrap the dough in plastic wrap, and let it relax at room temperature 30 minutes to 3 hours.

Stretching and Thinning:
If using an extra-long rolling pin work with half the dough at a time. With a regular-length rolling pin, roll out a quarter of the dough at a time and keep the rest of the dough wrapped. Lightly sprinkle a large work surface with flour. The idea is to stretch the dough rather than press down and push it. Shape it into a ball and begin rolling out to form a circle, frequently turning the disc of dough a quarter turn. As it thins outs, start rolling the disc back on the pin a quarter of the way toward the center and stretching it gently sideways by running the palms of your hands over the rolled-up dough from the center of the pin outward. Unroll, turn the disc a quarter turn, and repeat. Do twice more.

Stretch and even out the center of the disc by rolling the dough a quarter of the way back on the pin. Then gently push the rolling pin away from you with one hand while holding the sheet in place on the work surface with the other hand. Repeat three more times, turning the dough a quarter turn each time.

Repeat the two processes as the disc becomes larger and thinner. The goal is a sheet of even thickness. For lasagne, the sheet should be so thin that you can clearly see your hand through it and see colours. Cut into rectangles about 4 by 8 inches (10 x 20 cm). Note: Enza says that transparency is a crucial element of lasagne pasta and the dough should be rolled as thinly as possible. She says this is why her housekeeper has such strong arms!

Dry the pasta at room temperature and store in a sealed container or bag.

#2 Bechamel
Preparation Time: 15 minutes
4 tablespoons (2 ounces/60g) unsalted butter
4 tablespoons (2 ounces/60g) all purpose unbleached (plain) flour, organic stone ground preferred
2&2/3 cups (approx 570ml) milk
Salt and freshly ground pepper to taste
Freshly grated nutmeg to taste

Using a medium-sized saucepan, melt the butter over low to medium heat. Sift over the flour, whisk until smooth, and then stir (without stopping) for about 3 minutes. Whisk in the milk a little at a time and keep the mixture smooth. Bring to a slow simmer, and stir 3 to 4 minutes, or until the sauce thickens. Cook, stirring, for about 5 minutes, until the sauce thickens. Season with salt, pepper, and a hint of nutmeg.

#3 Country Style Ragu’ (Ragu alla Contadina)
Preparation Time: Ingredient Preparation Time 30 minutes and Cooking time 2 hours

Makes enough sauce for 1 recipe fresh pasta or 1 pound/450g dried pasta)
3 tablespoons extra virgin olive oil (45 mL)
2 ounces/60g pancetta, finely chopped
1 medium onion, minced
1 medium stalk celery with leaves, minced
1 small carrot, minced
4 ounces/125g boneless veal shoulder or round
4 ounces/125g pork loin, trimmed of fat, or 4 ounces/125g mild Italian sausage (made without fennel)
8 ounces/250g beef skirt steak, hanging tender, or boneless chuck blade or chuck center cut (in order of preference)
1 ounce/30g thinly sliced Prosciutto di Parma
2/3 cup (5 ounces/160ml) dry red wine
1 &1/2 cups (12 ounces/375ml) chicken or beef stock (homemade if possible)
2 cups (16 ounces/500ml) milk
3 canned plum tomatoes, drained
Salt and freshly ground black pepper to taste

Working Ahead:
The ragu can be made 3 days ahead. Cover and refrigerate. It also freezes well for up to 1 month. Skim the fat from the ragu’ before using it.

Browning the Ragu Base:
Heat the olive oil in a 12 inch (30cm) skillet (frying pan) over medium-high heat. Have a large saucepan handy to use once browning is complete. Add the pancetta and minced vegetables and sauté, stirring frequently with a wooden spoon, 10 minutes, or until the onions barely begin to color. Coarsely grind all the meats together, including the prosciutto, in a food processor or meat grinder. Stir into the pan and slowly brown over medium heat. First the meats will give off a liquid and turn dull grey but, as the liquid evaporates, browning will begin. Stir often, scooping under the meats with the wooden spatula. Protect the brown glaze forming on the bottom of the pan by turning the heat down. Cook 15 minutes, or until the meats are a deep brown. Turn the contents of the skillet into a strainer and shake out the fat. Turn them into the saucepan and set over medium heat.

Reducing and Simmering:
Add the wine to the skillet, lowering the heat so the sauce bubbles quietly. Stir occasionally until the wine has reduced by half, about 3 minutes. Scrape up the brown glaze as the wine bubbles. Then pour the reduced wine into the saucepan and set the skillet aside.
Stir ½ cup stock into the saucepan and let it bubble slowly, 10 minutes, or until totally evaporated. Repeat with another ½ cup stock. Stir in the last 1/2 cup stock along with the milk. Adjust heat so the liquid bubbles very slowly. Partially cover the pot, and cook 1 hour. Stir frequently to check for sticking.

Add the tomatoes, crushing them as they go into the pot. Cook uncovered, at a very slow bubble for another 45 minutes, or until the sauce resembles a thick, meaty stew. Season with salt and pepper.
Related Posts with Thumbnails