About Recipes Restaurants FAQ My Kitchen My Kitchen

Tuesday, December 21, 2010

Moroccan chickpea and carrot tagine

DSC_0009

I'm on a mission to make more fish at home. My mission is frequently thwarted for pretty mundane reasons. One: I do my grocery shopping on Saturdays, so unless we have fish Saturday, I have to go back to the store for fresh fish later in the week. Two: I struggle to make the meal exciting. We love simply prepared fish. Drizzled with a little olive oil and lemon is the best way to enjoy most fish. But that can make for a lackluster meal unless the side dishes stand out. That's what led me to this dish... sort of.

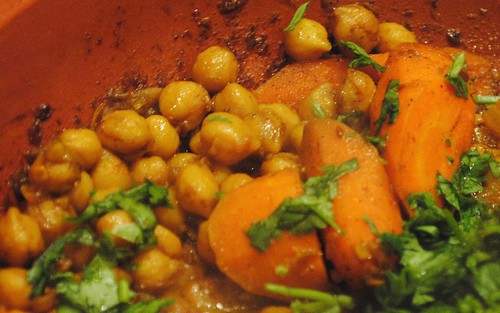
I set out to buy monkfish to make a fish tagine, but the store didn't have any... hmmm. My fish guy told me dover sole was the freshest thing he had - came in just hours earlier. I chose that, figuring I'd just broil it with a little onion, lemon pepper and olive oil. But now I needed a good side dish. The tagine cookbook was already out, so I turned to the vegetarian section and found this recipe for chick pea and carrot tagine. It's quick and easy, plus it's hardy enough to go with fish and packs in plenty of flavor.

Spicy carrot and chickpea tagine with turmeric and cilantro
adapted from Tagine by Ghillie Basan

2 Tbsp. olive oil
1 onion, finely chopped
3 garlic cloves, minced
1 tsp. ground turmeric
1 tsp. cumin seeds
1/2 tsp. ground cinnamon
1/4 tsp. cayenne pepper
1/4 tsp. black pepper
1/2 tbsp. honey
3 medium carrots, cut into thick slices on a diagonal
1 14.5-ounce can chickpeas, rinsed and drained
sea salt
a small bunch of cilantro, chopped
1/2 lemon, cut into wedges

Heat the oil in a tagine or heavy bottomed casserole dish, add the onion and garlic, and saute until soft. Add the turmeric, cumin, cinnamon, cayenne, black pepper, honey and carrots. Pour in enough water to cover the base of the tagine and cover with a lid. Cook gently for 10-15 minutes.

Toss in the chickpeas and check to make sure there's still enough water in the bottom of the tagine, cover, and cook for another 5-10 minutes. Season with salt and sprinkle the cilantro over the top. Serve with the lemon wedges.

Tuesday, December 7, 2010

Wacky Chocolate Cake: no bowl, three holes, and vegan!

DSC_0095

Some days, nothing but a moist piece of chocolate cake will do. Today was one of those days...for a number of reasons: It was cold, cold, cold out so baking seemed like a good idea. I haven't had chocolate cake in awhile. And it's my birthday, so why not celebrate with a little chocolate cake? But there's one problem: I can't have any dairy.

Why? Well, in late October (round about the time of my last post!) we found out our little girl can't digest milk protein, so no dairy for her or mommy for awhile. It's relatively easy to eliminate dairy - until you get to dessert. It seems to be some unwritten law that all the yummiest desserts contain some sort of dairy product - usually ridiculous amounts of butter. But a little digging online revealed many many recipes that are vegan or dairy free. I chose this one because it was quick and easy and promised me moist, chocolate cake.

I have to say I was more than a little skeptical. I mean, come on, this recipe calls for VINEGAR! in my cake? I felt a little like Sam I Am as he took his first bite of those green eggs and ham. The result? It's good, some might say very good. It's not dripping with buttercream, but it's moist - look at that crumb! I thought it needed a little extra chocolate so I've been dusting it with a little cocoa powder mixed with a bit of powdered sugar.

Anyway, give it a whirl. You don't even need a bowl! And while you're here leave a comment with your favorite dairy free baked goods.

Wacky Chocolate Cake

1 1/2 cups (7 ounces) bleached all-purpose flour
1/4 cup (0.75 ounce) unsweetened, nonalkalized cocoa powder
1/2 teaspoon baking soda
1/2 teaspoon salt
1 cup (7.5 ounces) granulated sugar
1 teaspoon vanilla extract
1 tablespoon white or cider vinegar
6 tablespoons vegetable oil
1 cup water

DSC_0046

1. Position a rack in the center of the oven and preheat to 375°F. Lightly grease an 8-inch square pan.

2. Sift the flour, cocoa, baking soda, and salt directly into the baking pan, then add the sugar. With your finger, poke 2 small holes and 1 large one in the dry ingredients. Into one of the small holes pour the vanilla, into the other one the vinegar, and into the larger one the oil.

DSC_0060 DSC_0066

3. Pour the water over all the ingredients and stir the ingredients together with a table fork, reaching into the corners, until you can’t see any more flour and the batter looks fairly well homogenized.

4. Bake for 35 to 40 minutes, or until the top is springy and a tester inserted in the center comes out dry. Cool the cake in the pan on a wire rack, then cut and serve it from the pan.

Storage
Keep at room temperature, wrapped airtight, for up to 3 days; refrigerate after that.

DSC_0079

Tuesday, October 19, 2010

Chunky beef chili with tomato corn salad

DSC_0015

Working for a California-based company means a lot of conference calls with the West Coast. Waiting for everyone to join leaves a lot of free time to talk about the weather. Frequently, I'm asked why I wouldn't prefer living somewhere with consistently warm weather, like California.

I remember in particular one call last winter. I was on with one guy from California and another from Romania. As I looked out the window, more than two feet of snow had already fallen and more was on the way. The guy from California wondered how I could stand it.

Today, in mid-October, it's crisp and windy. Leaves are floating through the air and it's simply beautiful. Sure, I'll be out there raking them up in a few weeks, but as I do I'll be breathing in that spectacular fall scent. Aside from that, there is, of course, the food. As the weather turns cooler, new produce comes into season and I pull out my recipes for slow-cooked, braised, or roasted foods. This chili is just the dish for a cool fall day: warm, hardy and more than a little bit spicy. Corn and tomatoes are still good, so the salad that tops the chili offers a hint of summer. I'm sure it would taste good on a 70 degree day someplace else, but on a cool day in New Jersey, it's not only tasty, but comforting as well.

So I'll take my changing seasons. And I'll pair them with the perfect foods for each. I'll have warm, soul-satisfying soups and stews for cold winter days, and cool, crisp salads for hot summer days. For me, the food just wouldn't taste the same without the changing seasons.

DSC_0005

Chunky beef chili with tomato corn salad
adapted from The New Slow Cooker

For the chili:
4 lb. boneless beef chuck, trimmed of most fat and cut into 1 inch chunks
Salt and freshly ground black pepper
2 Tbsp. canola oil
2 large yellow onions, coarsely chopped
8 cloves garlic, minced
2 chipotle chiles in adobo, finely chopped
1 Tbsp. chipotle chili powder
1 Tbsp. smoked paprika
2 tsp. ground cumin
1 tsp. dried oregano
1/2 tsp. crushed red pepper flakes, or more to taste
1 cup tomato paste
2 cups beef stock

For the tomato corn salad:
Kernels from 2 ears of corn
1 cup cherry or grape tomatoes, quartered
2 green onions, thinly sliced
3 Tbsp. chopped fresh cilantro
1/2 tsp. Dijon mustard
2 tsp. white vinegar
1/2 tsp. finely grated lime zest
1 Tbsp. lime juice
Salt and pepper

Season the beef generously with salt and pepper. In a large heavy frying pan over high heat, warm the oil. When the oil is hot, add half the beef and sear, turning as needed to brown evenly, until golden brown on all sides, about 5 minutes. Using a slotted spoon, transfer the beef to the slow cooker. Repeat with remaining beef.

Pour off most of the fat from the pan and return to medium heat. Add the onions to the pan and saute until softened. Add the garlic and cook for 1 minute more. Add the chipotle chiles with their sauce, chipotle powder, smoked paprika, cumin, oregano, red pepper flakes, and tomato paste. Stir well and cook for 2 minutes. Pour in 1 cup of the stock and stir to dislodge any brown bits from the bottom of the pan. Transfer to the slow cooker. Add remaining stock, salt and pepper to taste and stir to combine. Cover and cook on low for 5 hours. The meat should be very tender.

To make the salad: whisk the mustard, vinegar, zest, lime juice, and salt and pepper in a bowl. Toss with the tomatoes, corn, cilantro and green onions.

To serve, spoon the chili into bowls and top with some of the salad. (Add some cheddar cheese too if you like!)

Monday, October 11, 2010

Restaurant review: A Toute Heure, Cranford

It's been awhile since I've done a restaurant review. Having a baby will do that. We still go out but it's usually to our favorite local spots like Ginger Sushi or Bel Paese. But our anniversary was good reason to get dressed up and have Grandma and Grandpa over to babysit.

I first heard about A Toute Heure a couple years ago. I was reading an issue of New Jersey monthly and they had a feature on NJ's top chefs. It talked about David Drake and a few others, including Kara Decker. I'd never heard of her, but according to the article, she was doing great things with local ingredients right in nearby Cranford. Shortly after reading the article, we tried the now defunct Restaurant David Drake, but we just never made it to A Toute Heure (ATH), until now.

Reservations are a must at ATH; I made ours a month ahead via Open Table. Also note that this little gem is BYO, so bring your favorite bottle with you.

When we arrived, our table wasn't quite ready so the host (who owns the restaurant) offered us some house made rosemary nuts and a seat out on the porch. He promptly opened our wine and brought us some while we waited. After only about 5 minutes, we were shown to our table. He came over and welcomed us again and explained some of the night's features. The menu changes daily and features seasonal ingredients from local farms. A chalkboard in the restaurant lists all the farms that provide ingredients to ATH and the menu calls out some featured that night.

The menu offers starters, salads, bites and entrees. We shared two appetizers, a bite and two entrees. To start, I ordered a fricassee of mushrooms with green olives, and speck and topped with a local fried egg. The unusual combination includes some of my favorite things and it was delicious. Simply prepared, it was served in a small round pan. It had just a little bit of spice. The perfectly cooked egg added a silkiness to the whole thing. Jeff ordered peekytoe crab fritters. They were tasty, but a bit gummy inside and not quite as crisp on the outside as we would have liked. The "bite" we shared was a pulled pork croquette - these little nibbles were packed with flavor and crispy on the outside.

Our entrees were served promptly. I opted for duck leg confit with butternut squash puree and a light cabbage and carrot slaw. It was simply divine. The duck melted in your mouth and the squash puree was luxurious and creamy (perhaps more than a little butter in my butternut!). The cabbage added a fresh crunch. Jeff got braised short ribs over cheddar grits with wine braised cippolini onions. The ribs were perfectly cooked and the grits were so rich Jeff could barely finish them. Both entrees were perfectly made and full of flavor.

Other entree choices included steak frites, a pot of mussels (a signature dish), two types of fish, chicken and more, all using the best local produce currently in season. They also offer a vegetarian option.

For dessert, the restaurant offers a number of options as well as a selection of local cheeses. The menu was topped with an apple toffee cake and a note saying "It's back!". We ordered one to share - if it was good enough to make a comeback, we had to try it. Served with a scoop of homemade cinnamon ice cream, it was dense and sweet, delish! My only complaint was that it was served cold. The plate itself was cold, indicating the dessert had been plated ahead of time. ATH is a tiny restaurant and I'm sure the kitchen is small, so pre-plating the dessert may be necessity, but this cake, already amazing, would have been unbelievable served warn and just a little gooey, especially next to the cinnamon ice cream.

Warm, friendly service in a great atmosphere make ATH just the dof place we like. The food was seasonal, and very well prepared. The focus on local ingredients makes it even more appealing. We will go back (many times, I'm sure).

A Toute Heure on Urbanspoon

Tuesday, October 5, 2010

Dulce de leche cheesecake squares

DSC_0105

Last week, my husband and I celebrated our 3rd wedding anniversary. As any married person knows, the key to a happy marriage is about compromise. I chose this recipe as something of a compromise and let me tell you, if every compromise turned out this sweet, every marriage would last forever. See, Jeff's favorite dessert is cheesecake. I, on the other hand, don't really like cheesecake. But I wanted to make him something special; I remembered tearing this recipe from Bon Appetit a few months ago so I dug it out and gave it a whirl. I may not like cheesecake, but I LOVE dulce de leche. So dulce de leche cheesecake squares sounded like the perfect pairing of both of our likes.

To say this recipe is the perfect union would be an understatement. These are just plain delicious. Rich and creamy, the dulce de leche flavored cheese takes ordinary cheesecake to new heights. Topped with more rich milky caramel and a sprinkling of sea salt, I could eat these every day (I would not advise this however - I'm envisioning the episode of the Simpsons where Homer gets hugely fat and walks around in muu-muus - he must've eaten these every day!)

The recipe can be made ahead, but sprinkle the salt on at the last minute. If you don't have Fleur de Sel, any sea salt would do fine.

DSC_0095

Dulce de leche cheesecake squares
Bon Appetit, June 2010

Crust:
Nonstick vegetable oil spray
2 1/4 cups finely ground graham crackers (from about 17 whole graham crackers)
2 tablespoons sugar
1/4 teaspoon ground cinnamon
10 tablespoons (1 1/4 sticks) unsalted butter, melted
Filling:
3 8-ounce packages Philadelphia-brand cream cheese, room temperature
1 cup sugar
3 large eggs
1/2 cup purchased dulce de leche*
2 teaspoons vanilla extract
Glaze:
2/3 cup purchased dulce de leche
3 tablespoons (or more) heavy whipping cream
Fleur de sel**

DSC_0060 DSC_0062
DSC_0073 DSC_0085

For crust:
Preheat oven to 350°F. Coat 13 x 9 x 2-inch metal baking pan with nonstick spray. Mix graham cracker crumbs, sugar, and cinnamon in medium bowl. Add melted butter; stir until coated. Transfer crumb mixture to pan. Press evenly onto bottom of pan. Bake until crust is light golden, about 10 minutes. Cool completely on rack.

For filling:
Blend cream cheese and sugar in processor until smooth and creamy, about 1 minute, stopping occasionally to scrape down sides of bowl. Add eggs 1 at a time, processing 3 to 5 seconds to blend between additions. Add dulce de leche and vanilla; process until blended, about 10 seconds. Spread batter evenly over cooled crust. Bake until just set in center and edges are puffed and slightly cracked, about 38 minutes. Transfer to rack; cool completely.

For glaze:
Heat dulce de leche and 3 tablespoons cream in microwave-safe bowl in 10-second intervals until melted. Stir to blend, adding more cream by teaspoonfuls if too thick to pour (amount of cream needed will depend on brand of dulce de leche). Pour glaze over cooled cheesecake; spread evenly. Refrigerate until chilled, about 1 hour (glaze will not be firm). DO AHEAD: Can be made 2 days ahead. Cover; chill.

Cut cheesecake lengthwise into 4 strips, then crosswise into 6 strips, forming 24 bars. Sprinkle bars with fleur de sel.

* A thick, sweet sauce made from caramelized sugar in milk or from sweetened condensed milk; available at some supermarkets and specialty foods stores and at Latin markets.
** A type of sea salt; available at some supermarkets and at specialty foods stores.

Tuesday, September 28, 2010

Braised lamb shanks with feta and sweet peppers

DSC_0154

Up until a few years ago, my idea of a slow cooker was bland, mushy, overcooked food. I don't know quite where the misconception came from. My mom never had a slow cooker when we were growing up so I had never actually had food made in one. Nevertheless, when it came time to create a wedding registry, I put one on the list: an inexpensive model because I figured I wouldn't use it much. My how the times change. My basic Crock Pot is a true workhorse and has become one of my favorite kitchen tools. I've just added a 4th slow cooker cookbook to my collection and these lamb shanks are the first thing I tried.

The book - The New Slow Cooker: Fresh Recipes for the Modern Cook - recognizes that slow cooked food can be a bit lacking in texture. But it drives home how much flavor it can have if done right. Plus, each recipe has some sort of fresh addition, something added at the end that freshens everything up and adds more texture. In this recipe it's the peppers and feta. Others add a salsa or salad.

As my maternity leave nears an end, I love my slow cooker even more. I can throw a meal into it while my baby sleeps so that I can play with her while she's awake. Once I'm back at work, I'll be able to have meals ready so I can spend every precious minute with her when I get home in the evenings. Few other kitchen tools can give me that! So, please, if you have a favorite slow cooker recipe, share it. I'll need plenty as my daughter grows.

Braised Lamb Shanks with Sweet Peppers and Feta
adapted from The New Slow Cooker: Fresh Recipes for the Modern Cook

4 lamb shanks, about 1 lb. each trimmed of fat
Salt and freshly ground pepper
3 Tbsp. olive oil
1 yellow onion, finely chopped
1 large carrot, finely chopped
1 stalk celery, finely chopped
3 bay leaves
1 tsp. dry oregano
1 tsp. cumin
3/4 cup beef stock
1/2 cup dry white wine
1 small yellow bell pepper, seeded and thinly sliced
1 small red bell pepper, seeded and thinly sliced
2 cloves garlic, finely chopped
1 Tbsp. finely chopped fresh parsley
1 cup crumbled feta cheese

Season the lamb shanks generously all over with salt and pepper. In a large heave frying pan over medium-high heat, warm 2 tablespoons of the oil. When the oil is hot, working batches if necessary, sear the shanks and brown on all sides. Transfer to a plate.

Pour off most of the fat from the pan and return it to medium-high heat. Add the onion, carrot, celery, bay leaves, oregano and cumin and saute until the vegetables are golden, 6-8 minutes. Pour in the stock and wine and stir to dislodge any brown bits on the bottom of the pan. Transfer the contents of the pan to the slow cooker and stir in 1/2 teaspoon of salt and a few grinds of black pepper. Place the shanks on top. Cover and cook on the low setting for 7 hours, basting once or twice with the braising liquid if possible.

Carefully transfer the shanks to a platter and cover to keep warm. Strain the braising liquid into a small saucepan. Let stand a few minutes then skim away the fat with a large spoon. Bring to a boil over high heat and boil until reduced by half, about 5 minutes.

In a frying pan over medium-high heat, warm the remaining 1 tablespoon oil. Add the peppers and saute until just beginning to soften, about 10 minutes. Add the garlic and cook for 1 minute more. Remove from the heat, stir in the parsley and season with salt and pepper.

Divide the shanks among plates and drizzle with the braising liquid. Top with some of the peppers and then sprinkle the feta over the top and serve immediately.

Tuesday, September 21, 2010

Morning Glory Muffins

DSC_0120

Many of my most loved recipes come from my mom. When we were kids she cooked for us all the time (she still does!) and we've come to love a lot of the dishes. We also love to recall some of the kitchen mishaps as I'm sure my family will one day do with my little blunders (I can't wait!). We never fail to laugh about the time she put cinnamon in tacos or how my older brother karate chopped her pumpkin roll as it rested on the counter.

These particular muffins made numerous appearances throughout our childhood, though none quite so amusing as a cinnamon taco. They're chock full of flavor with carrots, coconut, cinnamon and more. Plus, they stay moist for days.

On the day I made them, "Morning Glory" seemed the perfect name too. Up with Claire at 5, I saw the sun come up on what turned out to be a perfect September day. A few puffy white clouds speckled the sky, but the sun was bright and a cool breeze was blowing. Perfect weather for a warm muffin and a hot cappuccino on the deck.

Morning Glory Muffins
2 c. flour
¾ c. sugar
2 tsp. baking powder
2 tsp. cinnamon
½ tsp. baking soda
¼ tsp. salt
2 c. finely shredded carrot
1 c. finely chopped apple
½ c. currants or raisins
½ c. chopped walnuts
½ c. shredded coconut
3 eggs
¾ c. cooking oil
2 tsp. vanilla

Preheat oven to 350°.

Lightly grease 18 2 ½-inch muffin cups, or line them with paper bake cups.

In a large mixing bowl, stir together the flour, sugar, baking powder, cinnamon, baking soda, and salt. With a wooden spoon, stir in carrot, apple, currants, coconut, and walnuts.

In a separate bowl, stir together the eggs, cooking oil and vanilla. Add mixture all at once to flour mixture and stir only until moistened.

Gently spoon the batter into the prepared muffin cups until each one is almost full.

Bake for about 30 minutes or until the top of a muffin springs back when lightly touched. Cool in the pan set on a wire rack for 5 minutes. Remove muffins from pan and cool on the rack. Serve warm or at room temperature.

Make 18 muffins.

Friday, September 10, 2010

Is it a muffin or is it a doughnut?

DSC_0111

Now that I've adjusted (more or less) to rising in the wee hours when our wee one is hungry, I find that the early morning is a fabulous time to cook. My husband also seems pretty happy about it. Last weekend, Saturday morning found me up at 5:30. With the sun just rising and cool temperatures, it seemed like the perfect time to make muffins.

Often on Saturdays, we visit the local bakery in Scotch Plains: the Suisse Pastry Shop. They have the BEST old-fashioned glazed donuts and really good apple fritters, among countless other tasty delights. These muffins taste a bit like those donuts and they're super easy to make. I'm also hoping they're a bit healthier! Another benefit: they make your house smell almost as good as the pastry shop.

DSC_0095

Donut muffins
adapted from Williams-Sonoma Muffins

7 Tbsp. unsalted butter, at room temperature
2/3 cup sugar
1 large egg
1 1/2 cups all-purpose flour
1 1/2 tsp. baking powder
1/2 tsp. baking soda
1/2 tsp. salt
1/4 tsp. freshly grated nutmeg
1/2 cup buttermilk
1 1/2 tsp. vanilla extract

For the topping:
1/3 cup sugar
1 Tbsp. ground cinnamon
4 Tbsp. unsalted butter, melted

Preheat oven to 350F. Line 9 muffin cups with foil liners, or grease 9 of the cups.

Using an electric mixer on medium speed, cream together the butter and sugar. Add the egg and beat until pale and smooth.

In a separate bowl, stir together the flour, baking powder, baking soda, salt and nutmeg. Add half to the butter mixture, then add the buttermilk, combining well after each addition. Add the remaining flour mixture and stir until just evenly moistened - the batter will be lumpy.

Spoon into the muffin cups and bake for about 20-25 minutes. Remove from oven and let cool in pan for 5 minutes. Remove from pan and continue cooling until cool enough to handle.

To finish, stir together the cinnamon and sugar in a dish and melt the butter in a separate dish. Dip each muffin top in the butter then press it in the sugar.

Makes 9 muffins.

DSC_0086

Wednesday, September 8, 2010

Cilantro Lime Shrimp

DSC_0057

To me, shrimp and chicken are like blank slates - they adapt to so many flavors and cooking styles. Both make frequent appearances in my house since they're easy to keep in the freezer and they're relatively inexpensive. Needless to say, I'm always on the lookout for new recipes for both - especially ones that will work on the grill. My friend Sarah is in a cooking club with several of her friends and she told me about this recipe for Cilantro Lime Shrimp. She'd made it for her group and said it's one of her new favorites. The original says to cook the shrimp on the stove, but I skewered and grilled them. The sugar in the marinade caramelized a bit and they were delicious: sweet, salty and just a little bit spicy. Jeff's verdict: make them again! Easily an appetizer or a main course, it comes together quickly, which is just perfect with my little one getting more playful every day. (Fortunately she also naps leaving mommy time to blog.)

Note well: the marinade can be made ahead, but don't add the shrimp until about 45 minutes before you cook them. The citrus in the marinade will start to cook the shrimp and will make them rubbery if left too long.

DSC_0039

Cilantro Lime Shrimp

¼ cup orange marmalade
½ cup fresh lime juice
3 large garlic cloves, minced and mashed to a paste with 1 tsp salt
½ cup fresh cilantro sprigs, chopped fine
2 Tbs olive oil
1 Tbs soy sauce
½ tsp dried hot red pepper flakes
1 pound large shrimp (about 24), shelled and deveined, leaving tail and first shell segment intact

DSC_0015 DSC_0027
DSC_0031

In a small bowl whisk together marmalade, lime juice, garlic paste, cilantro, oil, soy sauce, red pepper flakes, and salt and pepper to taste and reserve 1/3 cup in a ramekin for dipping sauce. In a large sealable plastic bag combine shrimp with remaining mixture and marinate, chilled, tossing occasionally to coat shrimp, 45 minutes.

Drain shrimp and thread onto skewers.  Grill until cooked through, a couple minutes on each side.

Garnish shrimp with cilantro sprigs and serve with reserved dipping sauce.

Wednesday, September 1, 2010

Olive and goat cheese tart

olive-goat-cheese-tart

Lately I've been seeing a lot of fabulous recipes on other blogs - I've been bookmarking them like mad and have actually found time to try a few. The ingredients in this one should leave no guesses as to why I decided to give it a try: olives, goat cheese and rosemary. Need I say more?? Oh and it's also from Todd English. Several years ago, we dined at Olives in New York. Thus began my love affair with Todd English. I will never forget the olive tapenade that was served at the start of the meal-  everything was delicious (including the martinis!).

olive-goat-cheese-tart (2)

The tapenade features in his recipe, but would be just as good slathered on bread, sandwiches, etc. The original recipe, which I got from Kate's Kitchen, calls for anchovy filets. I substituted anchovy paste because I had it on hand. And I may have bumped up the amount of goat cheese...

Served with grilled rack of lamb and a fennel, arugula and mixed baby tomato salad, we agreed this was the best dinner we've had since our daughter was born. We finished the leftover tart last night with some grilled chicken and it was still delicious. This recipe will be made again and again in my kitchen!

olive-goat-cheese-tart (6)

Olive & Goat Cheese Tart

1 T unsalted butter

1 large or 2 small onions, very thinly sliced
1 recipe black olive paste (follows)
1 recipe tart dough (follows)
1/2 c kalamata and cracked green olives, pitted and chopped
1/4 c crumbled goat cheese

For the crust:
1 1/8 c flour
1 1/2 t sugar
1/4 t kosher salt
1/4 c cold water
8 T unsalted butter cut into 8 pieces

Black olive paste:
1/2 cup pitted kalamata olives
1/4 cup extra virgin olive oil
2 tsp. fresh rosemary
2 cloves garlic
2 tsp. anchovy paste

Make the dough:
Pulse the flour, sugar and salt in a food processor. Add the water through the tube and pulse again. Keep the processor running and add the butter one piece at a time until the dough forms a ball. Refrigerate at least 20 minutes.

olive-goat-cheese-tart (4)

Make the black olive paste:
Combine all ingredients in a food processor and pulse until it forms a paste.

olive-goat-cheese-tart (3)

Make the tart:
Melt the butter in a pan and saute the onions until caramelized.
Preheat oven to 450F. Press the tart dough into the bottom and up the sides of a tart pan. Spread the olive paste evenly over the bottom, then top with the caramelized onions. Sprinkle the chopped olives over the onions and finish by crumbling the goat cheese over the top. Bake for 20-25 minutes or until the crust is golden and the cheese is beginning to brown.

Wednesday, August 25, 2010

Salted caramel walnut brownies

caramel-brownies (8)

I was all set to make coconut swirl brownies. The recipe was on the counter, and I'd noted the two things I needed from the grocery store. It was a done deal - and then I saw a post from Brown Eyed Baker for salted caramel brownies. Bye-bye coconut, hello salted caramel. I love the combination of salty and sweet - the way the salt makes your mouth water and gives the sweet a little something extra. A quick glance at the recipe eliminated that trip to the grocery store - I had everything I needed. In her post, Brown Eyed Baker mentions seeing a similar recipe on Pioneer Woman. I read through that one and my recipe is a combination of the two. I used the brownies from the first and the caramel from the second. I also added nuts and used 3 types of chocolate - why not?

Now, I do have to say I'm still adjusting to cooking with a newborn around. I set out all the ingredients during one moment of peace. Then during a nap, I set about making them... but she woke up. So I popped them in the oven while I fed her and then made the caramel sauce during the next feeding. It may have taken most of the day, but they were ready for us to enjoy after my little cream puff went to bed. The trick to cooking with a baby in the house, I'm learning, is to choose recipes that can be broken into different parts so that one or two steps can be completed whenever I have a few minutes... After all, we know who now makes the rules in our house! But who could resist this little sous chef!?!

DSC_0026

Salted Caramel Walnut Brownies

2 ounces semisweet chocolate, chopped
3 ounces bittersweet chocolate, chopped
2 ounces unsweetened chocolate, chopped
8 tablespoons (1 stick) unsalted butter, cut into quarters
3 tablespoons cocoa powder
3 eggs
1¼ cups granulated sugar
2 teaspoons vanilla extract
½ teaspoon salt
1 cup all-purpose flour
1/2 cup walnuts, lightly toasted
Salted Caramel Sauce (recipe follows)
Fine sea salt

caramel-brownies (3)

Adjust an oven rack to the lower-middle position and heat the oven to 350F. Spray an 8-inch square baking pan with nonstick cooking spray. Line the pan with overlapping pieces of foil and spray the foil.

In a medium heatproof bowl set over a pan of almost-simmering water, melt the chocolates and butter, stirring occasionally until smooth. (Or, melt in the microwave on 50% power for 30-second increments, stirring after each, until melted and smooth.) Whisk in the cocoa until smooth. Set aside to cool.

caramel-brownies (2)

Whisk together the eggs, sugar, vanilla, and salt in a medium bowl until combined, about 15 seconds. Whisk the warm chocolate mixture into the egg mixture; then stir in the flour until just combined. Pour about the brownie mixture into the prepared pan and spread into the corners.

Bake until slightly puffed and a toothpick inserted in the center comes out with a small amount of sticky crumbs, 35 to 40 minutes.

Cool completely, then sprinkle the walnuts over the top and pour the caramel sauce over the whole thing. Sprinkle with a little extra sea salt if desired. Allow to set. (Note: I left them in the pan to keep the sauce from oozing. The gelatine helped it set, but in August, it still spread. Keeping them in the pan ensure maximum caramel on each delicious bite!)

caramel-brownies (7)

Salted caramel sauce

1/4 cup Heavy Cream
1 cup Sugar
1/4 cups Water
2 Tbsp. Unsalted Butter, Cut Into Pieces
1 teaspoon Kosher Salt
1 package Powdered Gelatin Mixed With 2 Tbsp. Water

In a small saucepan over low heat, warm heavy cream. Do not boil.

In a separate tall saucepan, combine sugar and water. Do not stir. Place over medium-high heat and bring to a boil. Cook until the mixture turns an amber color—not too dark, but definitely amber. Remove pan from stove.

caramel-brownies (5) caramel-brownies (6)

Add warm cream, butter, and salt. Stir gently until mixture is smooth and well combined. When it is smooth and calmed down a bit, pour in gelatin/water mixture and stir.

caramel-brownies

Wednesday, August 18, 2010

Triple chocolate toffee walnut cookies

DSC_0026

In my kitchen, I have two cabinets dedicated to baking - one side has mixing bowls and such and the other is jam-packed with nuts, chips, sprinkles, extracts, etc. Over time, I end up with small amounts of numerous different things: a half cup or so each of a bunch of different things. Thus, these cookies! I use a basic cookie recipe and add whatever I have in the cabinet. This time it happened to be toffee bits and three kinds of chocolate chips: milk, semisweet and white. I also threw in some chopped walnuts. The result: chunky cookies packed with good stuff and a much neater cabinet!

DSC_0003

Try your favorite combo or let your own cabinet decide what goes into these cookies. Rather than letting nuts and chocolate get stale, this is a perfect way to make something delicious out of what you've got on hand.

DSC_0041

Triple chocolate toffee walnut cookies
  • ½ c. white sugar
  • 1/4 c. brown sugar
  • 1/4 c. butter (1/2 stick)
  • 1/4 c. shortening
  • 1 egg
  • 1 c. flour
  • ½ tsp. cream of tartar
  • 1 tsp. baking soda
  • 1/4 tsp. salt
  • ½ tsp. vanilla
  • 1 c. chocolate chips (use any combination of white, dark, milk, semi sweet, etc.)
  • 1/2 cup toffee bits
  • ½ c. chopped nuts
Preheat oven to 350°.

Cream together white sugar, brown sugar, butter and shortening, then beat in the egg. In another bowl, combine flour, cream of tartar, baking soda and salt. Combine flour mixture with butter mixture. Add vanilla and mix. Stir in chocolate chips, toffee and nuts (if using).

DSC_0010

Drop by rounded teaspoons onto cookie sheet and bake 8-10 minutes at 350°.

Makes about 3 dozen.

DSC_0024

Monday, August 9, 2010

The perfect little "e-Claire" plus Mediterranean lamb burgers

So I've been missing for almost a month now. But I've had a little something in the works that required my full attention. I was perfecting my little "e-Claire". This little cream puff was born on July 20th. I can't really call her little since she weighed a healthy 9 pounds 2 ounces - that's my kind of cream puff. But we named her Claire and she instantly earned the nickname eclair.

But now that we're getting into a routine with her, I'm getting back into the kitchen. I have a feeling it might take a while before I crack open The French Laundry, but there are plenty of great meals that can be made in less time. And more importantly, they can easily be prepped ahead of time so that we can sit down and enjoy a hot meal in between feeding, cuddling and just enjoying our little eclair.

lamb-burgers

These lamb burgers are packed with fresh mediterranean flavor - I first made them when trying to use up some ingredients I had in the fridge: kalamata olives, Greek yogurt and feta. They make a great weekend lunch or a simple supper. I like to use traditional Greek pocketless pitas, so I shape the burgers to fit in them. But your favorite rolls would work just fine too.

Keep the summer barbecues going with a change from a traditional cheeseburger. Have another favorite burger? Leave a comment and share your ideas with me and other readers!

Mediterranean Lamb Burgers

For the burgers:
1 1/2 pounds ground lamb
1/3 cup pitted kalamata olives, chopped
1 clove garlic, chopped
1/3 cup red onion, chopped
2 Tbsp. fresh oregano or mint, chopped
1/2 tsp. grated lemon zest
2 tsp. fresh lemon juice
Salt and freshly ground black pepper

For the dressing:
1/2 cup greek yogurt
2-inch piece of cucumber, grated
1 Tbsp. extra virgin olive oil
kosher or sea salt, to taste

4 pocketless pita or 4 rolls
a feww lettuce leaves or some baby arugula
1 tomato, sliced
1/2 cup crumbled feta

lamb-burgers (2)

Combine all the ingredients for the burgers and mix until combined. Don't overmix or the burgers will be tough. Form into 4 patties (round if you're using buns or ovals if you're using pita). Refrigerate for at least 30 minutes.

Combine dressing ingredients and refrigerate for at least 30 minutes.

Preheat grill on high. Spray the grill with a little cooking spray then grill the burgers to medium or medium-well, about 5 minutes per side.

To serve, heat the pitas in a pan on the stove then place a urger in each. Top with feta, tomato, dressing, lettuce or arugula.

Makes 4 burgers.

Thursday, July 15, 2010

Lamb and Cucumber Kebabs with Feta Sauce

lamb-kebabs (7)

I always feel a certain sense of accomplishment when I make a recipe from one of my magazines. It's most likely because I read through stacks of magazines, tear out countless recipes and then do nothing with the vast majority of them. They end up in all corners of my house: on tables, in the office, folded in cookbooks... But few of them are ever put to the test. This particular recipe caught my eye for a few reasons. First, it was on a little tear-out recipe card in the June issue of Living. Second, it was short and could easily be made on a weeknight. Third, it combined lamb and feta - yum! And perhaps most appealing, it had grilled cucumbers. The idea fascinated me. I love cukes - but they're for salads and such, not for grilling. Or are they?

Very much to our surprise, the cucumbers kept their crunch on the grill. They were juicy and provided a great change from the veggies we usually grill. Dipped in feta sauce and paired with a juicy piece of lamb, they just couldn't be better. I'm convinced. I wonder what I should grill next (I'm skeptical about lettuce on the grill too, so maybe that'll hit the flames sometime soon.)

lamb-kebabs

Bottom line, this recipe is an easy way to get great Greek flavors on your table in almost no time at all. The hardest part was trimming the leg of lamb. I bought a boneless leg that was a little over 3 pounds and I used half for this meal and froze the rest for a future dinner. It was more than enough for two of us - Jeff will have leftovers for lunch on Friday. If the sauce is too thick for your taste, add a little more olive oil.

lamb-kebabs (4)

Lamb and Cucumber Kebabs with Feta Sauce
adapted from Martha Stewart Living, June 2010

For the kebabs
1/4 cup extra virgin olive oil
1/2 teaspoon freshly grated lemon zest
Juice of 1 lemon
1/2 lemon, cut into 4 pieces
3 garlic cloves, minced
2 Tbsp. fresh oregano, finely chopped
About 1 1/2 pounds boneless leg of lamb, trimmed and cut into 1 1/2 inch pieces
1/2 and English cucumber, halved lengthwise then cut into 1-inch thick pieces
Salt and pepper

For the sauce
3 ounces feta, crumbled
4 ounces fat-free Greek yogurt
1 small garlic clove, minced
2 Tbsp. extra virgin olive oil
Juice of half a lemon

lamb-kebabs (1) lamb-kebabs (2)

To make the kebabs, combine the oil, zest, lemon juice, garlic, oregano and lamb in a non-reactive bowl. Sprinkle with a little salt and freshly ground black pepper to taste. (You don't need a lot of salt because the feta adds enough saltiness in the sauce). Cover and refrigerate for at least 30 minutes.

To make the sauce, combine all the ingredients in a food processor and blend until smooth. Refrigerate.

lamb-kebabs (3)

Heat grill on medium high heat. Alternate lamb and cucumber on skewers and finish each with a piece of lemon. Grill 10 to 12 minutes, turning once. Serve with the sauce.

lamb-kebabs (6)
Related Posts with Thumbnails