About Recipes Restaurants FAQ My Kitchen My Kitchen
Showing posts with label dessert. Show all posts

Wednesday, January 11, 2012

Resolutions and fabulous cake: Vanilla bean cake with salted caramel sauce

Vanilla bean cake with salted caramel sauce

In a recent meeting, my manager asked what our New Year's resolutions were. One teammate said hers was simple: No excuses. I like it. Definitely a good one to live by. I have a bit of a different approach. I come up with lots of resolutions - it makes it easier to find one that sticks... What are they? Read more, blog more, get organized... those are the simple ones. I'm doing pretty good on all 3 - I've already finished one and a half books thanks to my fabulous new iPad. I've bought a bunch of new baskets and such to help me sort all of my tiny one's toys, art supplies, etc.(For such a small person, she sure has a ton of stuff!) And here I am, blogging away. (My iPad will hopefully help with this too! Leave a comment if you have any tips on blogging with an iPad or favorite apps...)

We shall see how it goes... What are your resolutions? And the bigger question: are they sticking 10 days in?

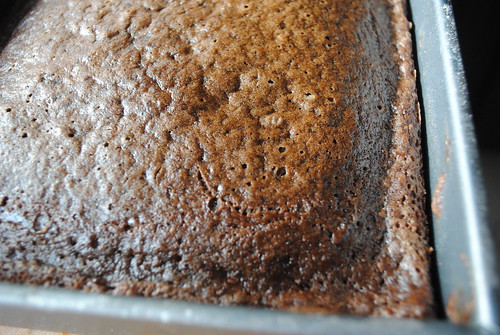
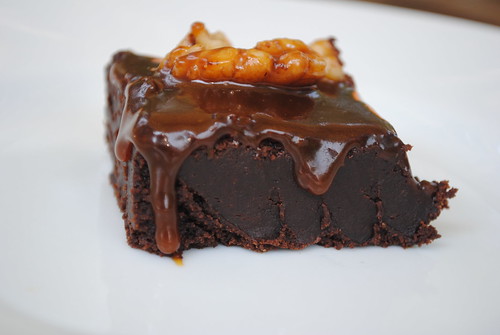
Though my blogging has been, well, non-existent, I have been cooking. Greek lamb shanks, Singapore style chicken curry, fish with smoked tomato butter... Some of them will make appearances here soon. But I wanted to start the New Year with something sweet, and this cake fits the bill.

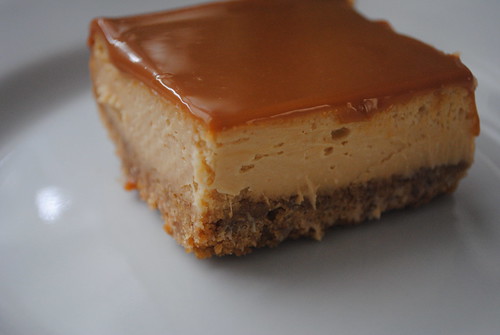
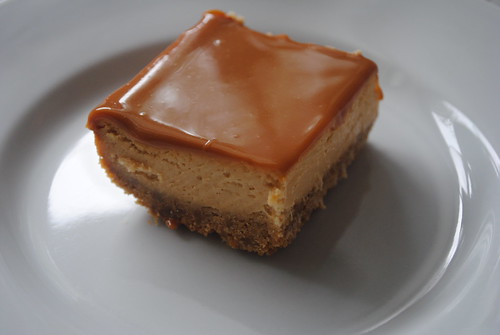
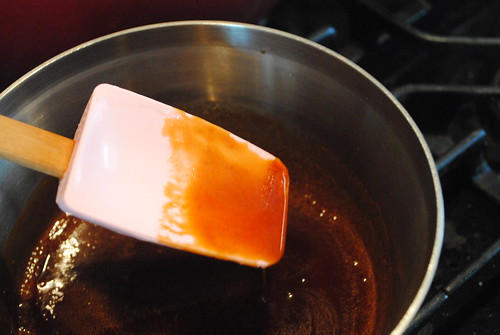
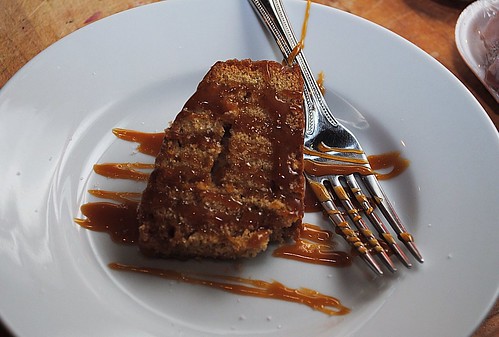
I'm a sucker for salted caramel, so this one was an easy pick. The cake is super-dense and the sauce super-sweet. I really could eat the sauce with a spoon... I drizzled extra sauce on it before serving, because more sauce is never a bad thing...

Vanilla bean cake with salted caramel sauce
adapted from Food & Wine Magazine

2 1/2 cups all-purpose flour
1 teaspoon baking powder
1 teaspoon salt
2 sticks unsalted butter, softened
1 cup granulated sugar
1/2 cup brown sugar
4 large eggs
1/4 cup crème fraîche, or sour cream
3 tablespoons vanilla paste; or 1 vanilla bean, seeds scraped
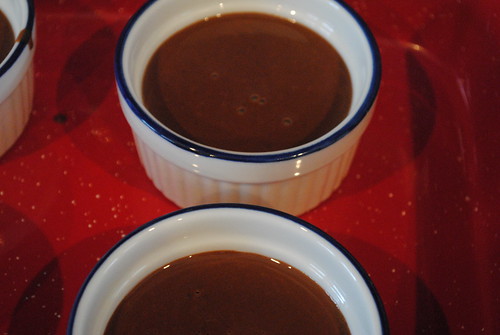
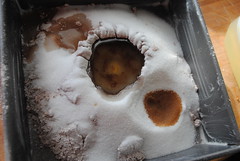
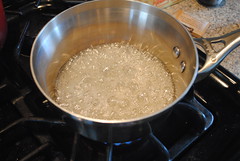
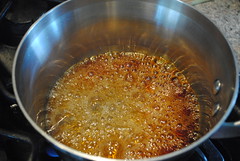
1 cup Salted Caramel Sauce (see recipe below) 

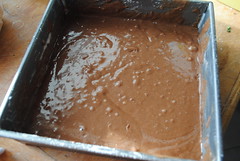
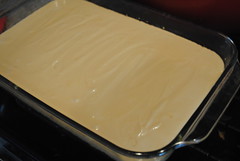
Preheat the oven to 350° and butter and flour a 9-inch round cake pan. In a medium bowl, whisk the flour with the baking powder and salt. In a large bowl, using a handheld electric mixer, beat the butter at medium speed until creamy. Add both sugars and beat until fluffy. Add the eggs one at a time, beating well between additions, then add the crème fraîche and vanilla. At medium-low speed, beat in the dry ingredients until smooth and evenly combined.

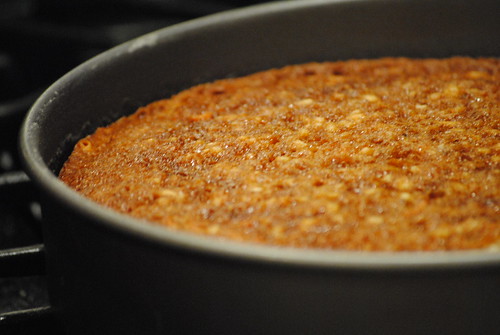
Scrape the batter into the prepared pan and smooth the surface. Bake in the center of the oven for about 1 hour, until the cake is golden and springy and a toothpick inserted into the center comes out with a few moist crumbs attached. Let the cake cool in the pan for 20 minutes. Turn the cake onto a plate then invert onto a rack and let cool.

Poke the top of the cake all over with a skewer and pour the caramel sauce over the cake, allowing it to seep in and drip down the side. Cut into wedges and serve.

MAKE AHEAD
The unglazed cake can be stored at room temperature for up to 3 days.

Monday, August 22, 2011

Rizogalo: Greek rice pudding

rice-pudding (1)

I love Greek food, so I was naturally excited when our new team intern at the office instituted a monthly international lunch and the theme for the inaugural event was Greek. The concept was simple: each month we'd designate a cuisine and everyone would bring in a dish representative of that cuisine to share for a team lunch. I immediately thought of about a dozen dishes, but then cold, stark reality set in. See, many of my teammates do not share my willingness to try just about anything you set in front of me (cross off grilled baby octopus salad). In fact, we have 2 vegetarians (cross off chicken souvlaki), and some other limitations as well. Plus, the lunch was on a Friday and I had a late meeting the evening before...
Oh and perhaps the most limiting: the only means of heating food in the office is a MICROWAVE!?!

I mean, come on, spanikopita in a microwave? (Somebody's little Greek grandmother just turned over in her grave at the very mention of it.)

So I needed something new... something I could make with ingredients I already had, in a limited amount of time and that would not need reheating... Thus, my quest led me to Rizogalo, or Greek rice pudding. I made a modified version of a recipe I found on Food for the Thoughtless. I scanned the ingredients and yes, I had all of them!

I don't really like rice pudding - or at least I thought I didn't, but this is GOOD. Sprinkled with a little cinnamon and a few toasted almonds. Delish!

The lunch was a hit - we had stuffed grape leaves, lots of hummus, a couple of Greek salads, olives, cheeses... and rice pudding for dessert!

Next month we've chosen Italian... So we'll have to see what I come up with for that one... In the meantime, give this a whirl and leave a comment to let me know what you think.

Rizogalo: Greek rice pudidng

Ingredients:
4 ½ cups whole milk
3/4 cups arborio rice
2 egg yolks, lightly beaten
1 teaspoon vanilla extract (or more to taste)
1/2 cup granulated sugar
Cinnamon  and toasted almonds for garnish

Preparation:
In a medium saucepan, bring the milk to a boil, then let simmer over low heat for about 5 minutes. Add rice and simmer for about 15 minutes, stirring frequently (think of it as a very loose risotto– you want to release the rice starch).

Temper the egg yolks with some of the hot milk, then add the yolk/milk mixture to the simmering rice. Stir in sugar. Continue to cook, stirring frequently (almost constantly) until you can draw a line in the custardy sauce on the back of a wooden spoon.  Add Vanilla extract. If you like your rice pudding loose and very creamy, stop cooking now. If you like it firmer and drier, continue to cook until most of the liquid has been absorbed.

Pour out into a large bowl to cool. Cover and refrigerate overnight.

To serve, garnish with cinnamon and toasted almonds.

Wednesday, May 18, 2011

Chocolate Pots de Creme

DSC_0003

For those of you wondering where I've been, I have an excuse. And I think it's a good excuse. I've been occupied with wagon rides, story time (Dr. Suess's A-B-C is our current fave), outings in our rainbow tent, and more. As a matter fact, just this evening, we had our very first dance party. Mind you, mom and dad are not exactly great dancers so I'm doubting my little one will have a future in it, but tonight, while Cookie Monster crooned away about all things cookie, my family was dancing and grooving.

Our little not-quite-10-month-old has recently figured out how to pull herself to standing. So tonight she pulled herself up and started bopping to the music, grinning from ear to ear. I tried to get a video but apparently my iPhone doesn't like to run the video camera AND Pandora at the same time... I'll be better prepared next time because the wee one was either really, really proud of herself or laughing at mom and dad's awful dance moves... I'm sure if the neighbors could see us they got quite a chuckle as well...

But more about dance parties another time. Bottom line, being a mom is just plain great and seems to get better all the time... I don't have as much time to cook, but every now and again, I get ambitious. These Pots de Creme are easy - I put them in the oven while Dad fed the baby and they were set and chilled by the time we finished dinner.

What are Pots de Creme? My husband asked me the same thing. I described it as kind of like mousse, but when he tasted it, we agreed it was denser and richer. (and yummier).

DSC_0007

Chocolate Pots de Creme
adapted from Good Food by Neil Perry

1/2 cup heavy cream
1/2 cup milk (I used 1%)
2 1/2 oz. good quality dark chocolate
3 egg yolks
2 Tbsp. Caster or superfine sugar
1 tsp. vanilla

Makes 4

Place the cream and milk in a heavy-bottomed saucepan over medium heat. Bring almost to a boil, then remove from heat. Add the chocolate and stir until the chocolate has completely melted.

Preheat the oven to 325F. Whisk the egg yolks, sugar and vanilla together in a bowl. Temper the eggs by adding a little of the chocolate mixture to the eggs and whisk. Add the remaining chocolate mixture to the eggs and whisk until well combined.

Pour evenly into 4 mugs or ramekins. Place in a roasting pan and pour boiling water around them about halfway up the sides of the dishes. Place in the lower third of the oven and bake until just set, about 25 minutes. Remove the cups to a wire rack to cool, then chill before serving.

Serve with whipped cream or berries if desired.

Tuesday, December 7, 2010

Wacky Chocolate Cake: no bowl, three holes, and vegan!

DSC_0095

Some days, nothing but a moist piece of chocolate cake will do. Today was one of those days...for a number of reasons: It was cold, cold, cold out so baking seemed like a good idea. I haven't had chocolate cake in awhile. And it's my birthday, so why not celebrate with a little chocolate cake? But there's one problem: I can't have any dairy.

Why? Well, in late October (round about the time of my last post!) we found out our little girl can't digest milk protein, so no dairy for her or mommy for awhile. It's relatively easy to eliminate dairy - until you get to dessert. It seems to be some unwritten law that all the yummiest desserts contain some sort of dairy product - usually ridiculous amounts of butter. But a little digging online revealed many many recipes that are vegan or dairy free. I chose this one because it was quick and easy and promised me moist, chocolate cake.

I have to say I was more than a little skeptical. I mean, come on, this recipe calls for VINEGAR! in my cake? I felt a little like Sam I Am as he took his first bite of those green eggs and ham. The result? It's good, some might say very good. It's not dripping with buttercream, but it's moist - look at that crumb! I thought it needed a little extra chocolate so I've been dusting it with a little cocoa powder mixed with a bit of powdered sugar.

Anyway, give it a whirl. You don't even need a bowl! And while you're here leave a comment with your favorite dairy free baked goods.

Wacky Chocolate Cake

1 1/2 cups (7 ounces) bleached all-purpose flour
1/4 cup (0.75 ounce) unsweetened, nonalkalized cocoa powder
1/2 teaspoon baking soda
1/2 teaspoon salt
1 cup (7.5 ounces) granulated sugar
1 teaspoon vanilla extract
1 tablespoon white or cider vinegar
6 tablespoons vegetable oil
1 cup water

DSC_0046

1. Position a rack in the center of the oven and preheat to 375°F. Lightly grease an 8-inch square pan.

2. Sift the flour, cocoa, baking soda, and salt directly into the baking pan, then add the sugar. With your finger, poke 2 small holes and 1 large one in the dry ingredients. Into one of the small holes pour the vanilla, into the other one the vinegar, and into the larger one the oil.

DSC_0060 DSC_0066

3. Pour the water over all the ingredients and stir the ingredients together with a table fork, reaching into the corners, until you can’t see any more flour and the batter looks fairly well homogenized.

4. Bake for 35 to 40 minutes, or until the top is springy and a tester inserted in the center comes out dry. Cool the cake in the pan on a wire rack, then cut and serve it from the pan.

Storage
Keep at room temperature, wrapped airtight, for up to 3 days; refrigerate after that.

DSC_0079

Tuesday, October 5, 2010

Dulce de leche cheesecake squares

DSC_0105

Last week, my husband and I celebrated our 3rd wedding anniversary. As any married person knows, the key to a happy marriage is about compromise. I chose this recipe as something of a compromise and let me tell you, if every compromise turned out this sweet, every marriage would last forever. See, Jeff's favorite dessert is cheesecake. I, on the other hand, don't really like cheesecake. But I wanted to make him something special; I remembered tearing this recipe from Bon Appetit a few months ago so I dug it out and gave it a whirl. I may not like cheesecake, but I LOVE dulce de leche. So dulce de leche cheesecake squares sounded like the perfect pairing of both of our likes.

To say this recipe is the perfect union would be an understatement. These are just plain delicious. Rich and creamy, the dulce de leche flavored cheese takes ordinary cheesecake to new heights. Topped with more rich milky caramel and a sprinkling of sea salt, I could eat these every day (I would not advise this however - I'm envisioning the episode of the Simpsons where Homer gets hugely fat and walks around in muu-muus - he must've eaten these every day!)

The recipe can be made ahead, but sprinkle the salt on at the last minute. If you don't have Fleur de Sel, any sea salt would do fine.

DSC_0095

Dulce de leche cheesecake squares
Bon Appetit, June 2010

Crust:
Nonstick vegetable oil spray
2 1/4 cups finely ground graham crackers (from about 17 whole graham crackers)
2 tablespoons sugar
1/4 teaspoon ground cinnamon
10 tablespoons (1 1/4 sticks) unsalted butter, melted
Filling:
3 8-ounce packages Philadelphia-brand cream cheese, room temperature
1 cup sugar
3 large eggs
1/2 cup purchased dulce de leche*
2 teaspoons vanilla extract
Glaze:
2/3 cup purchased dulce de leche
3 tablespoons (or more) heavy whipping cream
Fleur de sel**

DSC_0060 DSC_0062
DSC_0073 DSC_0085

For crust:
Preheat oven to 350°F. Coat 13 x 9 x 2-inch metal baking pan with nonstick spray. Mix graham cracker crumbs, sugar, and cinnamon in medium bowl. Add melted butter; stir until coated. Transfer crumb mixture to pan. Press evenly onto bottom of pan. Bake until crust is light golden, about 10 minutes. Cool completely on rack.

For filling:
Blend cream cheese and sugar in processor until smooth and creamy, about 1 minute, stopping occasionally to scrape down sides of bowl. Add eggs 1 at a time, processing 3 to 5 seconds to blend between additions. Add dulce de leche and vanilla; process until blended, about 10 seconds. Spread batter evenly over cooled crust. Bake until just set in center and edges are puffed and slightly cracked, about 38 minutes. Transfer to rack; cool completely.

For glaze:
Heat dulce de leche and 3 tablespoons cream in microwave-safe bowl in 10-second intervals until melted. Stir to blend, adding more cream by teaspoonfuls if too thick to pour (amount of cream needed will depend on brand of dulce de leche). Pour glaze over cooled cheesecake; spread evenly. Refrigerate until chilled, about 1 hour (glaze will not be firm). DO AHEAD: Can be made 2 days ahead. Cover; chill.

Cut cheesecake lengthwise into 4 strips, then crosswise into 6 strips, forming 24 bars. Sprinkle bars with fleur de sel.

* A thick, sweet sauce made from caramelized sugar in milk or from sweetened condensed milk; available at some supermarkets and specialty foods stores and at Latin markets.
** A type of sea salt; available at some supermarkets and at specialty foods stores.

Wednesday, August 25, 2010

Salted caramel walnut brownies

caramel-brownies (8)

I was all set to make coconut swirl brownies. The recipe was on the counter, and I'd noted the two things I needed from the grocery store. It was a done deal - and then I saw a post from Brown Eyed Baker for salted caramel brownies. Bye-bye coconut, hello salted caramel. I love the combination of salty and sweet - the way the salt makes your mouth water and gives the sweet a little something extra. A quick glance at the recipe eliminated that trip to the grocery store - I had everything I needed. In her post, Brown Eyed Baker mentions seeing a similar recipe on Pioneer Woman. I read through that one and my recipe is a combination of the two. I used the brownies from the first and the caramel from the second. I also added nuts and used 3 types of chocolate - why not?

Now, I do have to say I'm still adjusting to cooking with a newborn around. I set out all the ingredients during one moment of peace. Then during a nap, I set about making them... but she woke up. So I popped them in the oven while I fed her and then made the caramel sauce during the next feeding. It may have taken most of the day, but they were ready for us to enjoy after my little cream puff went to bed. The trick to cooking with a baby in the house, I'm learning, is to choose recipes that can be broken into different parts so that one or two steps can be completed whenever I have a few minutes... After all, we know who now makes the rules in our house! But who could resist this little sous chef!?!

DSC_0026

Salted Caramel Walnut Brownies

2 ounces semisweet chocolate, chopped
3 ounces bittersweet chocolate, chopped
2 ounces unsweetened chocolate, chopped
8 tablespoons (1 stick) unsalted butter, cut into quarters
3 tablespoons cocoa powder
3 eggs
1¼ cups granulated sugar
2 teaspoons vanilla extract
½ teaspoon salt
1 cup all-purpose flour
1/2 cup walnuts, lightly toasted
Salted Caramel Sauce (recipe follows)
Fine sea salt

caramel-brownies (3)

Adjust an oven rack to the lower-middle position and heat the oven to 350F. Spray an 8-inch square baking pan with nonstick cooking spray. Line the pan with overlapping pieces of foil and spray the foil.

In a medium heatproof bowl set over a pan of almost-simmering water, melt the chocolates and butter, stirring occasionally until smooth. (Or, melt in the microwave on 50% power for 30-second increments, stirring after each, until melted and smooth.) Whisk in the cocoa until smooth. Set aside to cool.

caramel-brownies (2)

Whisk together the eggs, sugar, vanilla, and salt in a medium bowl until combined, about 15 seconds. Whisk the warm chocolate mixture into the egg mixture; then stir in the flour until just combined. Pour about the brownie mixture into the prepared pan and spread into the corners.

Bake until slightly puffed and a toothpick inserted in the center comes out with a small amount of sticky crumbs, 35 to 40 minutes.

Cool completely, then sprinkle the walnuts over the top and pour the caramel sauce over the whole thing. Sprinkle with a little extra sea salt if desired. Allow to set. (Note: I left them in the pan to keep the sauce from oozing. The gelatine helped it set, but in August, it still spread. Keeping them in the pan ensure maximum caramel on each delicious bite!)

caramel-brownies (7)

Salted caramel sauce

1/4 cup Heavy Cream
1 cup Sugar
1/4 cups Water
2 Tbsp. Unsalted Butter, Cut Into Pieces
1 teaspoon Kosher Salt
1 package Powdered Gelatin Mixed With 2 Tbsp. Water

In a small saucepan over low heat, warm heavy cream. Do not boil.

In a separate tall saucepan, combine sugar and water. Do not stir. Place over medium-high heat and bring to a boil. Cook until the mixture turns an amber color—not too dark, but definitely amber. Remove pan from stove.

caramel-brownies (5) caramel-brownies (6)

Add warm cream, butter, and salt. Stir gently until mixture is smooth and well combined. When it is smooth and calmed down a bit, pour in gelatin/water mixture and stir.

caramel-brownies

Tuesday, July 6, 2010

Berry-bottom cake with vanilla-almond whipped cream

berry-cake (2)

The arrival of the farmer's market always excites me - perhaps a bit too much. I tend to overbuy. I mean, there are only two of us and yet I bring home bags full of fresh produce. But who can resist fresh produce at its peak? And after all, I'm supporting local farms, right?

Needless to say, I often find myself looking for ways to use excess produce. This cake was a great way to finish up blueberries and strawberries. I made a simple sheet cake, but the same recipe would make a 9-inch layer cake. Just whip up your favorite frosting to go with it. In lieu of a heavy frosting, I made a vanilla-almond whipped cream. Fast and simple - and nice and light in the hot weather.

berry-cake (4)

The verdict: I loved it. My husband, not so much. Of course he was in the mood for chocolate (so this week we have brownies... and they are yummy!)

Try it with your favorite fruit or berries. The cake is dense and moist and would suit just about any fruit.

Berry-bottom cake

3 1/2 cups cake flour
1/2 teaspoon salt
1/2 teaspoon baking soda
1/2 teaspoon baking powder
3/4 cup unsalted butter at room temperature
2 cups sugar
1/3 cup water
4 large eggs
2 teaspoons vanilla
1 cup plus 2 tablespoons buttermilk
2 1/2-3 cups fresh mixed berries (blue berries, strawberries, etc.)

For the whipped cream:
1 cup heavy cream
1 teaspoon vanilla extract
1/4 teaspoon almond extract
1/4 cup powdered sugar

Preheat oven to 350F. Butter and flour a 9x13-inch glass baking dish.

Sift flour, salt, baking soda and baking powder into a bowl and set aside. Using an electric mixer, beat the butter until light and fluffy. Gradually add sugar. Add the vanilla and water and mix until combined, then add the eggs, one at a time. Beat in flour mixture in 4 additions, alternating with buttermilk. Fold in the berries.

berry-cake (3)

Spread batter in prepared baking dish and bake until the top is golden and a tester inserted in the center comes out clean, about 45 minutes.

berry-cake

Cool in pan on a rack.

To make the whipped cream, beat the cream, vanilla and almond extract on high until soft peaks are formed. Gradually beat in the sugar. (Taste for sweetness as you go adding more or less sugar according to your taste,)

If serving cake all at once, spread cream over cooled cake and serve. Otherwise, keep cream in fridge and put a scoop on each piece as you go.

berry-cake (1)

Wednesday, May 5, 2010

Lemon Bars: taste of sunshine

lemon-bars

For me, cooking is one of the most enjoyable activities. I love whipping up delicious concoctions in my kitchen. After a long day or week at work, it's a great way to get my mind off things (and my eyes off the computer screen.) To a lot of people, cooking is work and there will always be people who see my time in the kitchen as work - but for me, it's a hobby and one I enjoy and would never willingly give up. Might sound strange to many people - probably not my readers since most of you are foodies like me.

I guess it comes down to the saying, "to each his own". I know people who love running marathons. I don't get it. All that time and training - and all those miles... I'm all for exercising to stay healthy, just like I'm sure marathon runners are all for food to stay nourished, but marathons are to me what The French Laundry cookbook must be to others.

Anyway, I'm rambling. It's my love of cooking that always leads me to seek out new recipes and I was pretty psyched to find this one for lemon bars. In my little kitchen in Fanwood, I was able to bake up a fresh batch of sunshine. That's exactly what each of these sweet, tart bars tastes like: pure sunshine. When was the last time your hobby let you create sunshine?

lemon-bars (1)

This recipe is from the Barefoot Contessa cookbook - I followed it exactly (surprising, I know!). I did have to bake mine a bit longer but I think that's just because my oven has a mind of it's own.

Lemon Bars
from the Barefoot Contessa Cookbook

lemon-bars (2)

For the crust:

  •  1/2 pound unsalted butter, at room temperature
  • 1/2 cup granulated sugar
  • 2 cups flour
  • 1/8 teaspoon kosher salt
For the filling:
  • 6 extra-large eggs at room temperature
  • 3 cups granulated sugar
  • 2 tablespoons grated lemon zest (4 to 6 lemons)
  • 1 cup freshly squeezed lemon juice
  • 1 cup flour
  • Confectioners' sugar, for dusting
Preheat the oven to 350 degrees F.

For the crust, cream the butter and sugar until light in the bowl of an electric mixer fitted with the paddle attachment. Combine the flour and salt and, with the mixer on low, add to the butter until just mixed. Dump the dough onto a well-floured board and gather into a ball. Flatten the dough with floured hands and press it into a 9 by 13 by 2-inch baking sheet, building up a 1/2-inch edge on all sides. Chill.

lemon-bars (3)

Bake the crust for 15 to 20 minutes, until very lightly browned. Let cool on a wire rack. Leave the oven on.

For the filling, whisk together the eggs, sugar, lemon zest, lemon juice, and flour. Pour over the crust and bake for 30 to 35 minutes, until the filling is set. Let cool to room temperature.

Cut into triangles and dust with confectioners' sugar.

lemon-bars (4)

Thursday, April 15, 2010

Raspberry Almond Crumb bars with Toasted Coconut

raspberry-crumb-bars

The arrival of Spring always makes me crave fruit. The trouble is that it's still a bit too early to get much fresh fruit - or at least fresh fruit that hasn't travelled across the country to get to my plate. Another thing I like about Spring is that it's still cool enough to turn on the oven and not so hot that room temperature butter is soup. Take the two together and baking fruity treats is just the ticket.

I've been on a raspberry kick of late. I bought some raspberry sorbet and a big jar of raspberry jam. I got the jam home, went to put it in the cupboard and found... another big jar of raspberry jam! Ooops. Jar number one must find a suitable use. I flipped through a couple baking books and found a recipe I liked in the Martha Stewart Baking Handbook. Her Jam Crumb Bars had only a few ingredients and would be the perfect use for my jam. They needed a little something extra though so I added some almond extract and toasted coconut.

raspberry-crumb-bars (4)

These buttery, rich bars are easy to make. They require cooling time in between baking so throw something else in the oven to make good use of the heat while the crust cools. The limited number of ingredients is a welcome change to many of the dishes I attempt and believe me, these have all the flavor in the world: butter, raspberry and almond with a hint of toasted coconut. Yum!

Feel free to substitute your favorite jam (or whichever flavor you accidentally bought 2 jars of). Strawberry, apricot, blackberry - anything would pair nicely with the flavors. And until more fresh fruit arrives, these are full of fruit flavor (which makes them healthy, right??).

I'll be craving another fruit dessert soon, so leave a comment with your favorite or a link to something you've made...

raspberry-crumb-bars (5)

Raspberry Almond Crumb Bars with Toasted Coconut
adapted from the Martha Stewart Baking Handbook

1/2 cup coconut
2 1/2 sticks butter, at room temperature, cut into pieces, plus extra for pan
1 3/4 cup blanched almonds, finely ground in a food processor
3 cups all-purpose flour
1 1/4 cup sugar
1/2 tsp. salt
1/2 tsp. almond extract (optional)
1 3/4 cups raspberry jam (or use your favorite fruit jam)

raspberry-crumb-bars (1)

Preheat oven to 350F. Sprinkle the coconut in a single layer on a baking sheet and bake until toasted, stirring occasionally.

Butter a 13x9-inch cookie sheet (1/4 sheet pan), then line the bottom with parchment allowing about an inch to hang over on each of the long sides. Set aside.

In a large bowl, whisk together the flour, almonds, sugar, and salt. Sprinkly the almond extract over the mixture and the cut in the butter using a pastry blender until the mixture resembles coarse crumbs. Using your fingers, squeeze the mixture together to create pea-sized crumbs with a few larger clumps.

raspberry-crumb-bars (2)

Transfer 2/3 of the mixture to the prepared baking dish and press it firmly and evenly in the bottom of the pan. Use a rolling pin to flatten the crust. Be sure there are no holes or cracks. Bake until light golden all over, about 20 minutes. Allow to cool completely.

raspberry-crumb-bars (3)

Combine the cooled toasted coconut with the remaining crumb mixture.

Spread the jam over the cooled crust. Sprinkle the ramining crumb mixture over the jam, squeezing some into clumps. Bake about 20-22 minutes until the topping is light golden and the jam is bubbling around the edges but not too dark. Remove pan to a wire rack to cool completely.

Run a kinfe around the edges and transfer to a cutting board. Cut into individual bars. Store in an airtight container for up to 4 days.

Thursday, April 8, 2010

Spring in action: Lemon mascarpone layer cake

lemon-cake (1)

The coming of Spring means different things to different people. In our family it means a lot of celebrating. There's Easter, Mother's Day, and birthdays galore. Both of my nieces have Spring birthdays, as does my brother-in-law. This year was a perfect storm of sorts with Easter falling on my brother-in-law's birthday and just 3 days after my youngest niece's 1st birthday.

Easter weekend - always full of food and treats - was especially celebratory this year. We attended a 1st birthday party for little Catie on Saturday with 2 cakes and then my sister baked a cake on Sunday for her husband's birthday. Her lemon mascarpone layer cake was a hit with everyone and the lemon was perfect for an unseasonably warm Spring day.

Given how yummy this cake was and how beautiful, I thought we'd give a guest spot to my sister for today's post. I plan to file this recipe away for future use so it only seemed fitting to share it with everyone. Enjoy!

Note well, to save time, you can substitute good quality store-bought lemon curd for the homemade. You'll need about 16 ounces.

lemon-cake

Lemon Mascarpone Layer Cake
Adapted from Bon Appetit

Lemon curd
1 cup sugar
3/4 cup fresh lemon juice
3 large eggs
3 large egg yolks
1/4 cup (1/2 stick) chilled unsalted butter, cut into 1/2-inch cubes

Cake
6 large eggs, separated
14 tablespoons sugar
1 3/4 cups sifted cake flour (sifted, then measured)
1/4 teaspoon salt

Syrup
1/2 cup sugar
1/3 cup boiling water
1/4 cup fresh lemon juice

Filling and frosting
2 cups chilled heavy whipping cream
3/4 cup sugar
3 8-ounce containers chilled mascarpone cheese

For lemon curd:
Whisk first 4 ingredients in medium metal bowl. Set bowl over saucepan of simmering water (do not allow bottom of bowl to touch water). Whisk constantly until thickened and instant-read thermometer inserted into mixture registers 160°F, about 10 minutes. Remove bowl from over water. Add butter; whisk until melted. Transfer 1 cup curd to small bowl for spreading on cake layers. Reserve remaining curd for filling. Press plastic wrap directly onto surface of both curds. Chill overnight. (Can be made 3 days ahead. Keep chilled.)

For cake:
Position rack in center of oven and preheat to 375°F. Line bottom of two 9-inch-diameter cake pans with parchment paper. Using electric mixer (hand mixer recommended here since you'll need it for several different items, and a stand mixer with only one bowl would be problematic) beat egg yolks and 7 tablespoons sugar in large bowl until mixture is very thick and slowly dissolving ribbons form when beaters are lifted, about 4 minutes. Using clean and dry beaters, beat whites in another large bowl until soft peaks form, about 3 to 4 minutes. Add remaining 7 tablespoons sugar, 1 tablespoon at a time, beating until stiff and glossy, at least another 4 minutes. Fold half of whites into yolk mixture, then sift half of flour and 1/4 teaspoon salt over and gently fold in until incorporated. Fold in remaining whites, then sift remaining flour over and fold in just until combined, being careful not to deflate batter.

Divide batter between pans; smooth tops. Bake until tester inserted into center of cakes comes out clean, about 10 to 12 minutes. Cool in pans on racks.

Run knife around edge of pans to loosen cakes. Invert cakes onto rack, tapping on work surface if necessary to release cakes. Cut each cake horizontally in half (layers will be thin). Peel off parchment and set layers aside while you make the syrup and filling.

For syrup:
Place sugar in small metal bowl. Add 1/3 cup boiling water; stir to dissolve sugar. Stir in lemon juice.

For filling and frosting:
Beat cream and sugar in large bowl until peaks form. Add mascarpone to lemon curd in medium bowl; whisk until well blended. Fold whipped cream into lemon-mascarpone mixture.

Place 1 cake layer, flat side up, on platter. Brush with syrup (do not drench the cake). Spread a thin layer of lemon curd over it, then about 1 cup lemon-mascarpone filling. Top with second cake layer; brush with syrup and spread with lemon curd and 1 cup lemon-mascarpone filling. Repeat with third cake layer, syrup, lemon curd, and filling. Top with fourth cake layer. Brush with syrup, then spread lemon curd over. Spread the lemon-mascarpone filling over the cake top and sides to coat it (like a crumb coat). Fill pastry bag fitted with 1/4-inch star tip (to be used for rosettes) with filling. Pipe small rosettes of frosting over top of cake, covering completely. Spread remaining lemon-mascarpone filling as a frosting over sides of cake until covered. You may not use all of the filling so keep it for another use if you want. Refrigerate at least 6 hours and up to 1 day.If your filling is too soft to pipe the rosettes, just put the bowl of filling in the refrigerator for about 15 minutes until it firms up a bit.

Remove from refrigerator about 30 minutes before serving.

lemon-cake (3)

Wednesday, March 24, 2010

Super moist carrot cake with cream cheese frosting

carrot-cake

We always spend some time during the holidays with my husband's family in Canada. Inevitably, my mother-in-law cooks up a storm and the menu always features my husband's favorite dishes. My absolute favorite is her carrot cake. This cake is moist, packed with flavor, and just perfect. Nuts and rasins give it texture. I like to think it's healthy - after all it has whole what flour, carrots and pineapple!

I like to let this cake sit at least overnight before serving. It just tastes better after a day or so - the flavor of the pineapple melds with the flour and cinnamon into that unique yumminess that is carrot cake. If you need a make-ahead dessert, give this recipe a shot.

carrot-cake (1)

Carrot Cake

For the cake:
3 eggs
¾ cup buttermilk
¾ cup vegetable oil
1 ½ cups white sugar
2 teaspoons vanilla extract
2 teaspoons ground cinnamon
¼ teaspoon salt
1 cup all purpose flour
1 cup whole wheat flour
2 teaspoons baking soda
2 1/2 cups shredded carrots
1/2 cup flaked coconut
1 cup chopped walnuts
1 (8 ounce) can crushed pineapple with juice
1 cup raisins

For the frosting:
1 lb. cream cheese, at room temperature
1 stick (8 Tbsp.) unsalted butter, at room temperature
4 tsp. vanilla
About 3/4 lb. powdered sugar

carrot-cake (2)

Make the cake:
Preheat oven to 350 degrees. Grease and flour 2 9-inch baking pans.

In medium bowl, sift together flour, baking soda, salt and cinnamon. Set aside.

In a large bowl, combine eggs, buttermilk, oil, sugar and vanilla. Mix well. Add flour mixture and mix well.

In a medium bowl, combine carrots, coconut, walnuts, pineapple and raisins. Using a large wooden spoon or a very heavy whisk, add carrot mixture to batter and fold in well. Pour into pans and bake at 350 degrees for 35-40 minutes, or until a tester comes out clean.

Remove from oven and let cool in pans for about 10 minutes, then turn the cakes onto racks to cool completely.

Make the frosting:
Beat together the cream cheese. butter and vanilla. Add powdered sugar gradually to desired thickness and sweetness
Related Posts with Thumbnails