About Recipes Restaurants FAQ My Kitchen My Kitchen

Saturday, November 29, 2008

November DB challenge: Caramel Cake with Caramelized Butter Frosting


This month's Daring Bakers' challenge was a tasty treat indeed and it proved the perfect 2nd dessert for Thanksgiving along with Mom's pumpkin pie. I let my caramel syrup get good and dark to give the cake and frosting more flavor. I also halved the frosting recipe and had plenty.
This recipe is from Shuna Fish Lydon and you can find it here on her blog: Click me! This month's challenge is hosted by Dolores at Culinary Curiosity, Alex at Blondie and Brownie, Jenny from Foray into Food, and alternative baking help from Natalie at Gluten a Go-Go.

CARAMEL CAKE WITH CARAMELIZED BUTTER FROSTING

10 Tablespoons unsalted butter at room temperature
1 1/4 Cups granulated sugar (or less, I used a little under 1 cup)
1/2 teaspoon kosher salt
1/3 Cup Caramel Syrup (see recipe below)
2 eggs, at room temperature
splash vanilla extract
2 Cups all-purpose flour
1/2 teaspoon baking powder
1 cup milk, at room temperature

Preheat oven to 350F

Butter one tall (2 – 2.5 inch deep) 9-inch cake pan or cupcake pans. In the bowl of a stand mixer fitted with a paddle attachment, cream butter until smooth. Add sugar and salt & cream until light and fluffy. Slowly pour room temperature caramel syrup into bowl. Scrape down bowl and increase speed. Add eggs/vanilla extract a little at a time, mixing well after each addition. Scrape down bowl again, beat mixture until light and uniform.

Sift flour and baking powder. Turn mixer to lowest speed, and add one third of the dry ingredients. When incorporated, add half of the milk, a little at a time. Add another third of the dry ingredients, then the other half of the milk and finish with the dry ingredients. {This is called the dry, wet, dry, wet, dry method in cake making. It is often employed when there is a high proportion of liquid in the batter.}

Take off mixer and by hand, use a spatula to do a few last folds, making sure batter is uniform. Turn batter into prepared cake pan. Place cake pan on cookie sheet or 1/2 sheet pan. Set first timer for 30 minutes, rotate pan and set timer for another 15-20 minutes. Your own oven will set the pace.

Bake until sides pull away from the pan and skewer inserted in middle comes out clean. Cool cake completely before icing it. Cake will keep for three days outside of the refrigerator.


CARAMEL SYRUP

2 cups sugar
1/2 cup water
1 cup water (for "stopping" the caramelization process)

In a small stainless steel saucepan, with tall sides, mix water and sugar until mixture feels like wet sand. Brush down any stray sugar crystals with wet pastry brush. Turn on heat to highest flame. Cook until smoking slightly: dark amber. When color is achieved, very carefully pour in one cup of water. Caramel will jump and sputter about! It is very dangerous, so have long sleeves on and be prepared to step back. (Wear oven mitts to protect your hands!) Whisk over medium heat until it has reduced slightly and feels sticky between two fingers. {Obviously wait for it to cool on a spoon before touching it.}

Note: For safety reasons, have ready a bowl of ice water to plunge your hands into if any caramel should land on your skin.

CARAMELIZED BUTTER FROSTING (I cut this in half and had plenty)

12 tablespoons unsalted butter
1 pound confectioner’s sugar, sifted
4-6 tablespoons heavy cream
2 teaspoons vanilla extract
2-4 tablespoons caramel syrup
Kosher or sea salt to taste

Cook butter until brown. Pour through a fine meshed sieve into a heatproof bowl, set aside to cool.Pour cooled brown butter into mixer bowl.
In a stand mixer fitted with a paddle or whisk attachment, add confectioner's sugar a little at a time. When mixture looks too chunky to take any more, add a bit of cream and or caramel syrup. Repeat until mixture looks smooth and all confectioner's sugar has been incorporated. Add salt to taste.Note: Caramelized butter frosting will keep in fridge for up to a month.To smooth out from cold, microwave a bit, then mix with paddle attachment until smooth and light.

(recipes above courtesy of Shuna Fish Lydon)

Sunday, November 16, 2008

Last Supper #5: Nancy Silverton

I've been a bit delinquent in this posting, considering we ate this dinner two weeks ago. So it goes sometimes...

For her last supper, Nancy Silverton listed an antipasto consisting of salami, mozzarella, pecorino romano, almonds and olives; fresh crusty bread, Bistecca Fiorentina, Braised radicchio, roasted onions and grilled zucchini.

We went for the antipasto but left out the mozzarella. Then I made Bistecca Fiorentina following a recipe that appears in Mario Batali's Italian Grill. Rubbed with extra virgin olive oil and fresh herbs, it grilled beautifully. The radicchio I wrapped in pancetta, then braised it. I roasted red onions in the oven (they look a little dark in the picture, but were delicious!). I drizzled both with a balsamic-whole grain dijon vinaigrette. Both went great with the steak.

All-in-all another great dinner from Project Last Supper. That's 5 complete since late September and 35 to go in the coming months. Next up: French chef Helene Darroze.

Monday, November 10, 2008

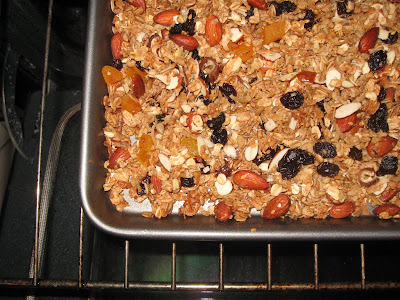
Granola for Tracy

We had family and friends visit from Canada this weekend. It was a busy one: into the City, shopping, cooking, out to dinner... I promised Tracy the recipe for granola and just ran out of time to write it down. So here you go Tracy, you guys should be pulling into Petrolia right about now!


Cinnamon Almond granola
(or really whatever kind you want)


2 1/2 cups old fashioned oats
1 cup coconut
1/2 cup shelled sunflower or pumpkin seeds (unsalted)
1/4 cup flax seed, optional
1 cup whole unsalted almonds (or any nuts you like)
1 tsp ground cinnamon
1 cup brown sugar
1/4 cup water
3 Tbsp. vegetable oil
1 tsp vanilla extract or vanilla bean paste
1/4 tsp. almond extract (optional)
1 cup dried fruit of your choice (cranberries, raisins, dates, apricots, currants...)

Preheat oven to 325 and spray a large baking sheet with cooking spray.

In a large bowl, combine the oats, nuts, flax seed if using, coconut, sunflower or pumpkin seeds and cinnamon. Toss to mix evenly.

In a small pan, combine sugar, vanilla, water, oil, and almond extract. Bring to a boil. Pour over oat mixture and stir until evenly combined. Spread mixture evenly on baking sheet and bake for 15 minutes. Stir to break it apart and then bake another 12 minutes. Add the fruit and bake about 10 minutes more or until it starts to get a bit darker but not burned. Allow to cool completely on baking sheet and store in an airtight container.

Great over vanilla yogurt or with milk!

Chili for a chilly night

It's time for a break from the gourmet. Tonight we are having chili! I use my Mom's recipe, but add a little something extra: grilled fillet! We had guests this weekend and on Friday night we grilled a whole fillet. There's some left, so I'm going to cut it up and throw it into my chili. It adds a great grilled taste to this winter warmer!

Here's the recipe. (I kinda sorta measure things)

Mom's chili
  • 1 1/2 lbs ground beef
  • 1 or two green peppers cut into 1 inch cubed
  • 1 or two yellow onions chopped
  • 1 28 oz can tomatoes in their juice
  • 4+ Tbsp. Chili powder
  • Garlic powder to taste
  • Crushed red pepper to taste
  • 1 bay leaf
  • 1 can kidney beans, drained and rinsed
  • Grilled steak, optional, cut into bite sized pieces
In a pot over medium heat, cook the ground beef, peppers and onions until beef is browned and vegetables are softened. Drain off the fat. Add the tomatoes, breaking them apart as you add them. Stir in the chili powder, crushed red pepper, garlic powder and bay leaf. Simmer about 45 minutes. Stir in the kidney beans and steak if using. Cook to desired consistency. Be sure to taste for salt and pepper. I sometimes add more crushed red pepper or chili powder...

Serve with grated cheddar and crusty bread or cornbread. Jeff loves a grilled cheese with his chili!

Monday, November 3, 2008

Survey Says...

October's poll featured foods starring pumpkin. There was a tie between pumpkin cranberry walnut bread and pumpkin ravioli, so it looks like I have my work cut out for me. We had guests this weekend so I made the bread last week. One left disappeared pretty quickly at my office and the second was enjoyed by our Canadian visitors (with a chunk to Dad of course). We'll have to wait and see when I have time to make the ravioli so watch for more.


Get the recipe on epi.


This month's poll features some new cookie recipes, in plenty of time for Christmas baking! So take a sec and vote for your favorite! I'll bake the winner in December along with some of my favorite Christmas cookies!

Friday, October 31, 2008

Last Supper #4: Tom Aikens


It was the starter that stole the showin this meal. Last Saturday, Project Last Suppoer continued featuring the selections of Chef Tom Aikens, an English-born chef with 3 restaurants in London. His menu was quite lengthy so I chose a selection: his recipe for Scallops with Sauce Vierge, which is featured in My Last Supper, Dover Sole in Brown Butter with Capers, Thick-cut potato wedges, a green salad with French vinaigrette and last but not least, Mom's apple pie. He probably meant his Mom's but lacking her recipe, I went with my Mom's and it never fails.
I found the biggest freshest sea scallo0ps at a local Kings supermarket. Those of you who know me are thinking, "But you don't like scallops..." I liked these! The sauce was delicious and I cooked them probably a little more than some chefs would but they were moist and perfect. Jeff claims they're the best scallops he ever had! I put the recipe below as I prepared it.
The sole was fresh caught as well and was very simple with the brown butter and capers and some lemon. The potatoes I tossed with a little EVOO and some of Penzey's 4S Seasoned Salt. The salad was a mix of spring greens with a bit of celery and fennel. I dressed with a simple French vinaigrette made from lemon juice, shallots, whole grain dijon mustard, EVOO, salt and pepper.
We finished with a slice of apple pie. For the first time I even used my Mom's recipe for crust. It's not as flaky as hers, but I'll keep practicing!
Now for those scallops:
Tom Aikens' Scallops with Sauce Vierge (my slightly modified version, but you'll have to check the book to see what I changed)
Serves 2-3
1/3 cup plus 6 Tbsp Extra Virgin Olive Oil
2 shallots, finely diced
1 clove garlic, finely diced
1 cup fish stock
1-2 vine ripe tomatoes, chopped in a 1/2 inch dice
Juice of one lemon
1 tsp. fresh basil, finely chopped
1 tsp. fresh chives, finely chopped
Pinch of dry or fresh tarragon (you can put 1 tsp if you like, but tarragon isn't our favorite)
Coarse sea salt and black pepper
6 extra large sea scallops
1 tsp. butter
To prepare the sauce:
In a large saute pan, heat 3 Tbsp. of the oil over low heat. Add shallots and garlic and saute until tender. Add the fish stock and reduce the liquid by two-thirds. Add the 1/3 cup of olive oil, tomatoes, and the lemon juice (and if using dried tarragon, add it at this time; otherwise wait til the fresh herbs are added at the end) and simmer gently for 4-5 minutes. Remove the sauce from the heat and stir in the fresh herbs. Season generously withsalt and pepper.
Prepare the scallops:
While the sauce is simmering, heat the remaining 3 Tbsp. of olive oil in a saute pan over high heat. Add the scallops and cooks for 1 minute on each side, then add the butter and toss the scallops in the butter until they are golden all over and cooked to your liking.
To serve:
Spoon the sauce into the bottom of the plates or dishes and place 2-3 scallops on top.
Last Supper Count: 4 done; 36 more to go. Up next: Guillaume Brahimi or Nancy Silverton. Either way, delicious beef!

Thursday, October 30, 2008

DB October Challenge: PIZZA!!!!

Since we were travelling in September, I missed the Daring Bakers' Challenge so I was very excited to learn that the October challenge was pizza - homemade, from scratch. I've made pizza at home before but always with store bought dough.


It also worked out nicley that my husband's birthday is in October so we had pizza night on his birthday. He chose the toppings: pepperoni, homemade marinara, buffalo mozzarella from a local maker, prosciutto, mushrooms, onions, fresh basil and a little fresh grated Parmeggiano Reggiano. It was excellent although I think my dough was a bit too moist. I cut the recipe in half and it made 2 good sized pies. We at 1 and I delivered te second hot and fresh to Mom and Dad!


Here's the recipe:

~ BASIC PIZZA DOUGH ~
Original recipe taken from “The Bread Baker’s Apprentice” by Peter Reinhart.

Makes 6 pizza crusts (about 9-12 inches/23-30 cm in diameter).

  • 4 1/2 Cups (20 1/4 ounces/607.5 g) Unbleached high-gluten (%14) bread flour or all purpose flour, chilled
  • 1 3/4 Tsp Salt
  • 1 Tsp Instant yeast
  • 1/4 Cup (2 ounces/60g) Olive oil or vegetable oil (both optional, but it’s better with)
  • 1 3/4 Cups (14 ounces/420g or 420ml) Water, ice cold (40° F/4.5° C)
  • 1 Tb sugar
  • Semolina/durum flour or cornmeal for dusting

DAY ONE

  1. Mix together the flour, salt and instant yeast in a big bowl (or in the bowl of your stand mixer).
  2. Add the oil, sugar and cold water and mix well (with the help of a large wooden spoon or with the paddle attachment, on low speed) in order to form a sticky ball of dough.
  3. On a clean surface, knead for about 5-7 minutes, until the dough is smooth and the ingredients are homogeneously distributed. If it is too wet, add a little flour (not too much, though) and if it is too dry add 1 or 2 teaspoons extra water. NOTE: If you are using an electric mixer, switch to the dough hook and mix on medium speed for the same amount of time.The dough should clear the sides of the bowl but stick to the bottom of the bowl. If the dough is too wet, sprinkle in a little more flour, so that it clears the sides. If, on the contrary, it clears the bottom of the bowl, dribble in a teaspoon or two of cold water.The finished dough should be springy, elastic, and sticky, not just tacky, and register 50°-55° F/10°-13° C.
  4. Flour a work surface or counter. Line a jelly pan with baking paper/parchment. Lightly oil the paper.
  5. With the help of a metal or plastic dough scraper, cut the dough into 6 equal pieces (or larger if you want to make larger pizzas).NOTE: To avoid the dough from sticking to the scraper, dip the scraper into water between cuts.
  6. Sprinkle some flour over the dough. Make sure your hands are dry and then flour them. Gently round each piece into a ball. NOTE: If the dough sticks to your hands, then dip your hands into the flour again.
  7. Transfer the dough balls to the lined jelly pan and mist them generously with spray oil. Slip the pan into plastic bag or enclose in plastic food wrap. Put the pan into the refrigerator and let the dough rest overnight or for up to thee days. NOTE: You can store the dough balls in a zippered freezer bag if you want to save some of the dough for any future baking. In that case, pour some oil(a few tablespooons only) in a medium bowl and dip each dough ball into the oil, so that it is completely covered in oil. Then put each ball into a separate bag. Store the bags in the freezer for no longer than 3 months. The day before you plan to make pizza, remember to transfer the dough balls from the freezer to the refrigerator.

DAY TWO

  1. On the day you plan to eat pizza, exactly 2 hours before you make it, remove the desired number of dough balls from the refrigerator. Dust the counter with flour and spray lightly with oil. Place the dough balls on a floured surface and sprinkle them with flour. Dust your hands with flour and delicately press the dough into disks about 1/2 inch/1.3 cm thick and 5 inches/12.7 cm in diameter. Sprinkle with flour and mist with oil. Loosely cover the dough rounds with plastic wrap and then allow to rest for 2 hours.
  2. At least 45 minutes before making the pizza, place a baking stone on the lower third of the oven. Preheat the oven as hot as possible (500° F/260° C). NOTE: If you do not have a baking stone, then use the back of a jelly pan. Do not preheat the pan.
  3. Generously sprinkle the back of a jelly pan with semolina/durum flour or cornmeal. Flour your hands (palms, backs and knuckles). Take 1 piece of dough by lifting it with a pastry scraper. Lay the dough across your fists in a very delicate way and carefully stretch it by bouncing it in a circular motion on your hands, and by giving it a little stretch with each bounce. Once the dough has expanded outward, move to a full toss.
  4. When the dough has the shape you want (about 9-12 inches/23-30 cm in diameter - for a 6 ounces/180g piece of dough), place it on the back of the jelly pan, making sure there is enough semolina/durum flour or cornmeal to allow it to slide and not stick to the pan.
  5. Lightly top it with sweet or savory toppings of your choice.
  6. Slide the garnished pizza onto the stone in the oven or bake directly on the jelly pan. Close the door and bake for abour 5-8 minutes or until cheese is bubbling and crust is golden brown.
  7. Take the pizza out of the oven and transfer it to a cutting board or your plate. In order to allow the cheese to set a little, wait 3-5 minutes before slicing or serving.


Related Posts with Thumbnails