About Recipes Restaurants FAQ My Kitchen My Kitchen
Showing posts with label cake. Show all posts

Tuesday, July 31, 2012

Fresh peach cake

Untitled

Right now, everything in my home is geared toward getting ready. We're getting ready for the arrival of baby sister - just 6 weeks from tomorrow. So, as you might expect, we're hauling out boxes of clothes from big sister (and chuckling at how tiny everything is), washing clothes, installing car seats, assembling strollers and swings and such... the list goes on. Add to that the fact that we are on week 3 of a major renovation of our master bathroom - which should be done in the next day or two so they can start on the laundry room. Then in 2 weeks the painter arrives. In between, we have house guests every weekend... Getting ready? I'm going to need a 3 month break after all of this!!!

But the change is certainly exciting. My first little girl has made the transition to her big girl bed and she's loving it. She points to her old crib and says "baby sister's" and this weekend she tole me baby sister is her best friend. In my state of pregnancy-hormone overload, I almost cried...

So how to deal with all this chaos? Why not bake a cake? I had a couple of overripe peaches and a couple perfect peaches so this cake was just the thing. Leave a comment with your favorite way to use the season's peaches...

Untitled

Fresh Peach Cake
adapted from How Easy Is That? by Ina Garten


1/4 pound (1 stick) unsalted butter, at room temperature
1 1/2 cups sugar, divided
2 extra-large eggs, at room temperature
1 cup sour cream, at room temperature
1 1/2 teaspoons pure vanilla extract
2 cups all-purpose flour
1 teaspoon baking soda
1 teaspoon baking powder
1/2 teaspoon kosher salt
2 teaspoons ground cinnamon
3 large, ripe peaches, peeled, pitted, and sliced
1/2 cup chopped pecans
Directions
Preheat the oven to 350 degrees F. Grease a 9-inch square baking pan.

In the bowl of an electric mixer fitted with the paddle attachment, beat the butter and 1 cup of the sugar for 3 to 5 minutes on medium-high speed, until light and fluffy. With the mixer on low, add the eggs, one at a time, then the sour cream and vanilla, and mix until the batter is smooth. In a separate bowl, sift together the flour, baking soda, baking powder, and salt. With the mixer on low, slowly add the dry ingredients to the batter and mix just until combined. In a small bowl, combine the remaining 1/2 cup sugar and the cinnamon.

Spread half of the batter evenly in the pan. Top with half of the peaches, then sprinkle with two-thirds of the sugar mixture. Spread the remaining batter on top, arrange the remaining peaches on top, and sprinkle with the remaining sugar mixture and the pecans.

Bake the cake for 45 to 55 minutes, until a toothpick inserted in the center comes out clean. Serve warm or at room temperature.


Monday, July 9, 2012

Scrumptious, Moist Coconut Cake that's EASY!

DSC_0100

When the temperature outside rivals that of my oven, it's usually my cue not to turn the oven on. After all, I'm nearly 7 months pregnant which means I'm a walking oven to begin with. And my poor central air is cranking away just trying to keep us comfortable. So why add more heat to the mix by turning on the oven? This cake is as good a reason as any. It's moist, really moist. And easy (you start with a cake mix...) So on went the over (and I can hole up in the cold basement while it bakes...)

The recipe calls for 3 9-inch pans. As you will see from my photos, I have 2 9-inch, so I used an 8-inch for the top layer. Perhaps not the most beautiful results, but it sure was tasty...

DSC_0081

Moist, easy coconut cake
From Family Meal, by Tyler Florence


Cake:
1 package yellow cake mix
1 3.4 ounce package instant vanilla pudding
4 large eggs
1/4 cup coconut or vegetable oil
2 cups sweetened shredded coconut

Frosting:
2 cups sweetened shredded coconut
2 tablespoons unsalted butter, at room temperature
8 ounces cream cheese, at room temperature
2 teaspoons whole milk
3 1/5 cups confectioners sugar, sifted
1/2 teaspoon pure vanilla extract

Directions
Preheat the oven to 350 degrees F. Grease two 9 inch round cake pans and dust with flour, tapping out the excess.

In a large bowl, combine the cake mix, pudding mix, eggs, oil, and 1 1/2 cups water. With an electric mixer, beat on medium speed until well combined. Sir in the coconut.

Pour the batter into the prepared cake pans and bake for 35-40 minutes or until a toothpick inserted in the center comes out clean.

Make the frosting: Spread the coconut on a rimmed baking sheet. Toast in the oven for 10 minutes, or until lightly browned, stirring once or twice to ensure it browns evenly. Let cool. Combine the butter and cream cheese in a mixing bowl. Use an electric mixer on medium-high speed to beat until fluffy. Add the milk and beat until smooth. Beat in the confectioners’ sugar, then beat in the vanilla. Stir in all but 1/2 cup of the toasted coconut.

Place one cake layer on a cake stand and spread with some of the frosting. Add the next layer, then more frosting. Top with the last 1/2 cup of shredded coconut. Refrigerate until ready to serve.

Wednesday, January 11, 2012

Resolutions and fabulous cake: Vanilla bean cake with salted caramel sauce

Vanilla bean cake with salted caramel sauce

In a recent meeting, my manager asked what our New Year's resolutions were. One teammate said hers was simple: No excuses. I like it. Definitely a good one to live by. I have a bit of a different approach. I come up with lots of resolutions - it makes it easier to find one that sticks... What are they? Read more, blog more, get organized... those are the simple ones. I'm doing pretty good on all 3 - I've already finished one and a half books thanks to my fabulous new iPad. I've bought a bunch of new baskets and such to help me sort all of my tiny one's toys, art supplies, etc.(For such a small person, she sure has a ton of stuff!) And here I am, blogging away. (My iPad will hopefully help with this too! Leave a comment if you have any tips on blogging with an iPad or favorite apps...)

We shall see how it goes... What are your resolutions? And the bigger question: are they sticking 10 days in?

Though my blogging has been, well, non-existent, I have been cooking. Greek lamb shanks, Singapore style chicken curry, fish with smoked tomato butter... Some of them will make appearances here soon. But I wanted to start the New Year with something sweet, and this cake fits the bill.

I'm a sucker for salted caramel, so this one was an easy pick. The cake is super-dense and the sauce super-sweet. I really could eat the sauce with a spoon... I drizzled extra sauce on it before serving, because more sauce is never a bad thing...

Vanilla bean cake with salted caramel sauce
adapted from Food & Wine Magazine

2 1/2 cups all-purpose flour
1 teaspoon baking powder
1 teaspoon salt
2 sticks unsalted butter, softened
1 cup granulated sugar
1/2 cup brown sugar
4 large eggs
1/4 cup crème fraîche, or sour cream
3 tablespoons vanilla paste; or 1 vanilla bean, seeds scraped
1 cup Salted Caramel Sauce (see recipe below) 

Preheat the oven to 350° and butter and flour a 9-inch round cake pan. In a medium bowl, whisk the flour with the baking powder and salt. In a large bowl, using a handheld electric mixer, beat the butter at medium speed until creamy. Add both sugars and beat until fluffy. Add the eggs one at a time, beating well between additions, then add the crème fraîche and vanilla. At medium-low speed, beat in the dry ingredients until smooth and evenly combined.

Scrape the batter into the prepared pan and smooth the surface. Bake in the center of the oven for about 1 hour, until the cake is golden and springy and a toothpick inserted into the center comes out with a few moist crumbs attached. Let the cake cool in the pan for 20 minutes. Turn the cake onto a plate then invert onto a rack and let cool.

Poke the top of the cake all over with a skewer and pour the caramel sauce over the cake, allowing it to seep in and drip down the side. Cut into wedges and serve.

MAKE AHEAD
The unglazed cake can be stored at room temperature for up to 3 days.

Tuesday, December 7, 2010

Wacky Chocolate Cake: no bowl, three holes, and vegan!

DSC_0095

Some days, nothing but a moist piece of chocolate cake will do. Today was one of those days...for a number of reasons: It was cold, cold, cold out so baking seemed like a good idea. I haven't had chocolate cake in awhile. And it's my birthday, so why not celebrate with a little chocolate cake? But there's one problem: I can't have any dairy.

Why? Well, in late October (round about the time of my last post!) we found out our little girl can't digest milk protein, so no dairy for her or mommy for awhile. It's relatively easy to eliminate dairy - until you get to dessert. It seems to be some unwritten law that all the yummiest desserts contain some sort of dairy product - usually ridiculous amounts of butter. But a little digging online revealed many many recipes that are vegan or dairy free. I chose this one because it was quick and easy and promised me moist, chocolate cake.

I have to say I was more than a little skeptical. I mean, come on, this recipe calls for VINEGAR! in my cake? I felt a little like Sam I Am as he took his first bite of those green eggs and ham. The result? It's good, some might say very good. It's not dripping with buttercream, but it's moist - look at that crumb! I thought it needed a little extra chocolate so I've been dusting it with a little cocoa powder mixed with a bit of powdered sugar.

Anyway, give it a whirl. You don't even need a bowl! And while you're here leave a comment with your favorite dairy free baked goods.

Wacky Chocolate Cake

1 1/2 cups (7 ounces) bleached all-purpose flour
1/4 cup (0.75 ounce) unsweetened, nonalkalized cocoa powder
1/2 teaspoon baking soda
1/2 teaspoon salt
1 cup (7.5 ounces) granulated sugar
1 teaspoon vanilla extract
1 tablespoon white or cider vinegar
6 tablespoons vegetable oil
1 cup water

DSC_0046

1. Position a rack in the center of the oven and preheat to 375°F. Lightly grease an 8-inch square pan.

2. Sift the flour, cocoa, baking soda, and salt directly into the baking pan, then add the sugar. With your finger, poke 2 small holes and 1 large one in the dry ingredients. Into one of the small holes pour the vanilla, into the other one the vinegar, and into the larger one the oil.

DSC_0060 DSC_0066

3. Pour the water over all the ingredients and stir the ingredients together with a table fork, reaching into the corners, until you can’t see any more flour and the batter looks fairly well homogenized.

4. Bake for 35 to 40 minutes, or until the top is springy and a tester inserted in the center comes out dry. Cool the cake in the pan on a wire rack, then cut and serve it from the pan.

Storage
Keep at room temperature, wrapped airtight, for up to 3 days; refrigerate after that.

DSC_0079

Friday, September 10, 2010

Is it a muffin or is it a doughnut?

DSC_0111

Now that I've adjusted (more or less) to rising in the wee hours when our wee one is hungry, I find that the early morning is a fabulous time to cook. My husband also seems pretty happy about it. Last weekend, Saturday morning found me up at 5:30. With the sun just rising and cool temperatures, it seemed like the perfect time to make muffins.

Often on Saturdays, we visit the local bakery in Scotch Plains: the Suisse Pastry Shop. They have the BEST old-fashioned glazed donuts and really good apple fritters, among countless other tasty delights. These muffins taste a bit like those donuts and they're super easy to make. I'm also hoping they're a bit healthier! Another benefit: they make your house smell almost as good as the pastry shop.

DSC_0095

Donut muffins
adapted from Williams-Sonoma Muffins

7 Tbsp. unsalted butter, at room temperature
2/3 cup sugar
1 large egg
1 1/2 cups all-purpose flour
1 1/2 tsp. baking powder
1/2 tsp. baking soda
1/2 tsp. salt
1/4 tsp. freshly grated nutmeg
1/2 cup buttermilk
1 1/2 tsp. vanilla extract

For the topping:
1/3 cup sugar
1 Tbsp. ground cinnamon
4 Tbsp. unsalted butter, melted

Preheat oven to 350F. Line 9 muffin cups with foil liners, or grease 9 of the cups.

Using an electric mixer on medium speed, cream together the butter and sugar. Add the egg and beat until pale and smooth.

In a separate bowl, stir together the flour, baking powder, baking soda, salt and nutmeg. Add half to the butter mixture, then add the buttermilk, combining well after each addition. Add the remaining flour mixture and stir until just evenly moistened - the batter will be lumpy.

Spoon into the muffin cups and bake for about 20-25 minutes. Remove from oven and let cool in pan for 5 minutes. Remove from pan and continue cooling until cool enough to handle.

To finish, stir together the cinnamon and sugar in a dish and melt the butter in a separate dish. Dip each muffin top in the butter then press it in the sugar.

Makes 9 muffins.

DSC_0086

Tuesday, July 6, 2010

Berry-bottom cake with vanilla-almond whipped cream

berry-cake (2)

The arrival of the farmer's market always excites me - perhaps a bit too much. I tend to overbuy. I mean, there are only two of us and yet I bring home bags full of fresh produce. But who can resist fresh produce at its peak? And after all, I'm supporting local farms, right?

Needless to say, I often find myself looking for ways to use excess produce. This cake was a great way to finish up blueberries and strawberries. I made a simple sheet cake, but the same recipe would make a 9-inch layer cake. Just whip up your favorite frosting to go with it. In lieu of a heavy frosting, I made a vanilla-almond whipped cream. Fast and simple - and nice and light in the hot weather.

berry-cake (4)

The verdict: I loved it. My husband, not so much. Of course he was in the mood for chocolate (so this week we have brownies... and they are yummy!)

Try it with your favorite fruit or berries. The cake is dense and moist and would suit just about any fruit.

Berry-bottom cake

3 1/2 cups cake flour
1/2 teaspoon salt
1/2 teaspoon baking soda
1/2 teaspoon baking powder
3/4 cup unsalted butter at room temperature
2 cups sugar
1/3 cup water
4 large eggs
2 teaspoons vanilla
1 cup plus 2 tablespoons buttermilk
2 1/2-3 cups fresh mixed berries (blue berries, strawberries, etc.)

For the whipped cream:
1 cup heavy cream
1 teaspoon vanilla extract
1/4 teaspoon almond extract
1/4 cup powdered sugar

Preheat oven to 350F. Butter and flour a 9x13-inch glass baking dish.

Sift flour, salt, baking soda and baking powder into a bowl and set aside. Using an electric mixer, beat the butter until light and fluffy. Gradually add sugar. Add the vanilla and water and mix until combined, then add the eggs, one at a time. Beat in flour mixture in 4 additions, alternating with buttermilk. Fold in the berries.

berry-cake (3)

Spread batter in prepared baking dish and bake until the top is golden and a tester inserted in the center comes out clean, about 45 minutes.

berry-cake

Cool in pan on a rack.

To make the whipped cream, beat the cream, vanilla and almond extract on high until soft peaks are formed. Gradually beat in the sugar. (Taste for sweetness as you go adding more or less sugar according to your taste,)

If serving cake all at once, spread cream over cooled cake and serve. Otherwise, keep cream in fridge and put a scoop on each piece as you go.

berry-cake (1)

Thursday, April 8, 2010

Spring in action: Lemon mascarpone layer cake

lemon-cake (1)

The coming of Spring means different things to different people. In our family it means a lot of celebrating. There's Easter, Mother's Day, and birthdays galore. Both of my nieces have Spring birthdays, as does my brother-in-law. This year was a perfect storm of sorts with Easter falling on my brother-in-law's birthday and just 3 days after my youngest niece's 1st birthday.

Easter weekend - always full of food and treats - was especially celebratory this year. We attended a 1st birthday party for little Catie on Saturday with 2 cakes and then my sister baked a cake on Sunday for her husband's birthday. Her lemon mascarpone layer cake was a hit with everyone and the lemon was perfect for an unseasonably warm Spring day.

Given how yummy this cake was and how beautiful, I thought we'd give a guest spot to my sister for today's post. I plan to file this recipe away for future use so it only seemed fitting to share it with everyone. Enjoy!

Note well, to save time, you can substitute good quality store-bought lemon curd for the homemade. You'll need about 16 ounces.

lemon-cake

Lemon Mascarpone Layer Cake
Adapted from Bon Appetit

Lemon curd
1 cup sugar
3/4 cup fresh lemon juice
3 large eggs
3 large egg yolks
1/4 cup (1/2 stick) chilled unsalted butter, cut into 1/2-inch cubes

Cake
6 large eggs, separated
14 tablespoons sugar
1 3/4 cups sifted cake flour (sifted, then measured)
1/4 teaspoon salt

Syrup
1/2 cup sugar
1/3 cup boiling water
1/4 cup fresh lemon juice

Filling and frosting
2 cups chilled heavy whipping cream
3/4 cup sugar
3 8-ounce containers chilled mascarpone cheese

For lemon curd:
Whisk first 4 ingredients in medium metal bowl. Set bowl over saucepan of simmering water (do not allow bottom of bowl to touch water). Whisk constantly until thickened and instant-read thermometer inserted into mixture registers 160°F, about 10 minutes. Remove bowl from over water. Add butter; whisk until melted. Transfer 1 cup curd to small bowl for spreading on cake layers. Reserve remaining curd for filling. Press plastic wrap directly onto surface of both curds. Chill overnight. (Can be made 3 days ahead. Keep chilled.)

For cake:
Position rack in center of oven and preheat to 375°F. Line bottom of two 9-inch-diameter cake pans with parchment paper. Using electric mixer (hand mixer recommended here since you'll need it for several different items, and a stand mixer with only one bowl would be problematic) beat egg yolks and 7 tablespoons sugar in large bowl until mixture is very thick and slowly dissolving ribbons form when beaters are lifted, about 4 minutes. Using clean and dry beaters, beat whites in another large bowl until soft peaks form, about 3 to 4 minutes. Add remaining 7 tablespoons sugar, 1 tablespoon at a time, beating until stiff and glossy, at least another 4 minutes. Fold half of whites into yolk mixture, then sift half of flour and 1/4 teaspoon salt over and gently fold in until incorporated. Fold in remaining whites, then sift remaining flour over and fold in just until combined, being careful not to deflate batter.

Divide batter between pans; smooth tops. Bake until tester inserted into center of cakes comes out clean, about 10 to 12 minutes. Cool in pans on racks.

Run knife around edge of pans to loosen cakes. Invert cakes onto rack, tapping on work surface if necessary to release cakes. Cut each cake horizontally in half (layers will be thin). Peel off parchment and set layers aside while you make the syrup and filling.

For syrup:
Place sugar in small metal bowl. Add 1/3 cup boiling water; stir to dissolve sugar. Stir in lemon juice.

For filling and frosting:
Beat cream and sugar in large bowl until peaks form. Add mascarpone to lemon curd in medium bowl; whisk until well blended. Fold whipped cream into lemon-mascarpone mixture.

Place 1 cake layer, flat side up, on platter. Brush with syrup (do not drench the cake). Spread a thin layer of lemon curd over it, then about 1 cup lemon-mascarpone filling. Top with second cake layer; brush with syrup and spread with lemon curd and 1 cup lemon-mascarpone filling. Repeat with third cake layer, syrup, lemon curd, and filling. Top with fourth cake layer. Brush with syrup, then spread lemon curd over. Spread the lemon-mascarpone filling over the cake top and sides to coat it (like a crumb coat). Fill pastry bag fitted with 1/4-inch star tip (to be used for rosettes) with filling. Pipe small rosettes of frosting over top of cake, covering completely. Spread remaining lemon-mascarpone filling as a frosting over sides of cake until covered. You may not use all of the filling so keep it for another use if you want. Refrigerate at least 6 hours and up to 1 day.If your filling is too soft to pipe the rosettes, just put the bowl of filling in the refrigerator for about 15 minutes until it firms up a bit.

Remove from refrigerator about 30 minutes before serving.

lemon-cake (3)

Wednesday, March 24, 2010

Super moist carrot cake with cream cheese frosting

carrot-cake

We always spend some time during the holidays with my husband's family in Canada. Inevitably, my mother-in-law cooks up a storm and the menu always features my husband's favorite dishes. My absolute favorite is her carrot cake. This cake is moist, packed with flavor, and just perfect. Nuts and rasins give it texture. I like to think it's healthy - after all it has whole what flour, carrots and pineapple!

I like to let this cake sit at least overnight before serving. It just tastes better after a day or so - the flavor of the pineapple melds with the flour and cinnamon into that unique yumminess that is carrot cake. If you need a make-ahead dessert, give this recipe a shot.

carrot-cake (1)

Carrot Cake

For the cake:
3 eggs
¾ cup buttermilk
¾ cup vegetable oil
1 ½ cups white sugar
2 teaspoons vanilla extract
2 teaspoons ground cinnamon
¼ teaspoon salt
1 cup all purpose flour
1 cup whole wheat flour
2 teaspoons baking soda
2 1/2 cups shredded carrots
1/2 cup flaked coconut
1 cup chopped walnuts
1 (8 ounce) can crushed pineapple with juice
1 cup raisins

For the frosting:
1 lb. cream cheese, at room temperature
1 stick (8 Tbsp.) unsalted butter, at room temperature
4 tsp. vanilla
About 3/4 lb. powdered sugar

carrot-cake (2)

Make the cake:
Preheat oven to 350 degrees. Grease and flour 2 9-inch baking pans.

In medium bowl, sift together flour, baking soda, salt and cinnamon. Set aside.

In a large bowl, combine eggs, buttermilk, oil, sugar and vanilla. Mix well. Add flour mixture and mix well.

In a medium bowl, combine carrots, coconut, walnuts, pineapple and raisins. Using a large wooden spoon or a very heavy whisk, add carrot mixture to batter and fold in well. Pour into pans and bake at 350 degrees for 35-40 minutes, or until a tester comes out clean.

Remove from oven and let cool in pans for about 10 minutes, then turn the cakes onto racks to cool completely.

Make the frosting:
Beat together the cream cheese. butter and vanilla. Add powdered sugar gradually to desired thickness and sweetness

Thursday, February 11, 2010

A Study in White: Coconut Cake

barefoot-contessa-coconut-cake (26)

barefoot-contessa-coconut-cake (3)As a blizzard blasts the east, it's no surprise I have white on my mind. Wet snow clings to every tree and just when it appears to slow, another blast of snow falls. The only vehicles on my road today have been plows (and my poor husband leaving for work).  It's supposed to continue into the night, so Jeff will be firing up the snowblower when he gets home. To be sure snow isn't the only white he sees, I decided to whip up Ina Garten's Coconut Cake. Much more comforting than any snowstorm, this cake is flavored with vanilla and almond extracts, as well as plenty of coconut. The cream cheese frosting adds another layer of flavor... and whiteness!

This recipe appears in Barefoot Contessa At Home. Find her original Coconut Cupcakes in her first cookbook. Whether you go for bite-sized or the whole shebang, this is a delicious cake - moist, flavorful and all-around satisfying. Perhaps a mug of hot cocoa on the side...? We shall see...

barefoot-contessa-coconut-cake (7)
As you might guess, I made a few modifications. I added a bit more almond extract to the frosting and reduced the butter to 1 1/2 sticks. I also reduced the amount of powdered sugar - I used about 2/3 pound. I added a bit at a time until it got to the consistency and sweetness I like. I had more than enough to frost the cake - I actually had about 1/2 cup leftover. Oh! Watch the cooking time for the cakes. Mine were done after 40 minutes. I'd start with 35 minutes or so and see how they're doing. These cakes are dense so you really don't want them dry (I used dark metal non-stick Calphalon cake pans).

Coconut Cake
From Barefoot Contessa at Home, by Ina Garten
also available on foodnetwork.com
  • 3/4 pound (3 sticks) unsalted butter, at room temperature, plus more for greasing the pans
  • 2 cups sugar
  • 5 extra-large eggs, at room temperature
  • 1 1/2 teaspoons pure vanilla extract
  • 1 1/2 teaspoons pure almond extract
  • 3 cups all-purpose flour, plus more for dusting the pans
  • 1 teaspoon baking powder
  • 1/2 teaspoon baking soda
  • 1/2 teaspoon kosher salt
  • 1 cup milk
  • 4 ounces sweetened shredded coconut
For the frosting:
  • 1 pound cream cheese, at room temperature
  • 1/2 pound (2 sticks) unsalted butter, at room temperature
  • 3/4 teaspoon pure vanilla extract
  • 1/4 teaspoon pure almond extract
  • 1 pound confectioners' sugar, sifted
  • 6 ounces sweetened shredded coconut
barefoot-contessa-coconut-cake (10)
Directions

Preheat the oven to 350 degrees F. Grease 2 (9-inch) round cake pans, then line them parchment paper. Grease them again and dust lightly with flour.

In the bowl of an electric mixer fitted with a paddle attachment, cream the butter and sugar on medium-high speed for 3 to 5 minutes, until light yellow and fluffy. Crack the eggs into a small bowl. With the mixer on medium speed, add the eggs 1 at a time, scraping down the bowl once during mixing. Add the vanilla and almond extracts and mix well. The mixture might look curdled; don't be concerned.

In a separate bowl, sift together the flour, baking powder, baking soda and salt. With the mixer on low speed, alternately add the dry ingredients and the milk to the batter in 3 parts, beginning and ending with dry ingredients. Mix until just combined. Fold in the 4 ounces of coconut with a rubber spatula.

Pour the batter evenly into the 2 pans and smooth the top with a knife. Bake in the center of the oven for 45 to 55 minutes, until the tops are browned and a cake tester comes out clean. Cool on a baking rack for 30 minutes, then turn the cakes out onto a baking rack to finish cooling.

For the frosting, in the bowl of an electric mixer fitted with a paddle attachment, combine the cream cheese, butter, vanilla and almond extract on low speed. Add the confectioners' sugar and mix until just smooth (don't whip!).

To assemble, place 1 layer on a flat serving plate, top side down, and spread with frosting. Place the second layer on top, top side up, and frost the top and sides. To decorate the cake, sprinkle the top with coconut and lightly press more coconut onto the sides. Serve at room temperature.
barefoot-contessa-coconut-cake (19)

Tuesday, July 21, 2009

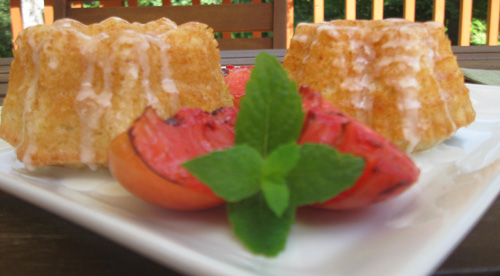
Summery lemon cakes with grilled pluots

Last Saturday, the farmer's market once again led me to try something new. Pluots look like plums, but are hybrids of plums and apricots. Sweet and juicy, they have greenish skin and bright pink flesh. I couldn't resist buying a container of 6 of them. I knew we'd never eat all of them (I had already bought peaches and raspberries), so I knew I had to serve them with something. I also gave one to my parents to try.

As I rode home, I decided on lemon cakes. I'd seen a recipe in Food Network Magazine that sounded interesting. So before the sun got too hot, I cranked up the oven. It was also a great opportunity to use my new mini bundt pan!! It makes 6 little cakes in 3 different designs.

One unique thing about this recipe is that it is prepared in a blender. So I hauled out my blender and started whizzing away. I made a number of modifications from the original and I also served them with grilled pluots. Here's my recipe. This makes 6 small or 12 mini bundt cakes. If you don't have the specialty pan, use muffin cups or whatever, just watch your baking time.


Lemon vanilla olive oil cakes with grilled pluots
For the cakes
  • 1 Tbsp. butter, melted
  • 1 cup flour, plus more for dusting
  • 1 1/3 cups sugar
  • 1 Tbsp. grated lemon zest
  • 2 eggs
  • 1 tsp. vanilla paste (or vanilla extract)
  • 1/4 cup Extra Virgin olive oil
  • 2/3 cup whole milk
  • 1/2 tsp. baking powder
  • 1/2 tsp. salt
For the glaze
  • 1 1/2 Tbsp. unsalted butter, melted
  • 2 Tbsp. fresh lemon juice
  • Confectioners' sugar (about 1 cup)
3 pluots, quartered, pits discarded (peaches or nectarines make a good substitute.)
Preheat oven to 350F. Brush pan with melted butter. Dust with flour, shaking off any excess.
Mix flour, salt and baking powder in a bowl with a fork. Set aside.
Pulse sugar and lemon zest in a blender until combined. Add eggs one at a time, blending between each addition. Add vanilla. Gradually pour in the olive oil and milk. Pulse until it forms a thin batter.
Add the flour mixture in 2 additions, mixing and scraping the sides between each.
Pour the batter into the prepared pan and bake in center of oven for about 25 minutes until cakes just start to pull away from the sides of the pan. Cool in the pan for 10 minutes then invert onto a rack. Cool slightly.
While cakes are in the oven, make the glaze. Whisk together the butter and lemon juice then whisk in confectioners sugar until glaze is the consistency you like. drizzle over the cakes.
Before serving, preheat the grill over medium-high heat. Grill the pluots, flesh-side down, for about 3 minutes per side. You want some grill marks to form, but you don't want them to turn to mush. Repeat on the other side.
Serve cakes with grilled pluots and a sprig of fresh mint.

Saturday, November 29, 2008

November DB challenge: Caramel Cake with Caramelized Butter Frosting


This month's Daring Bakers' challenge was a tasty treat indeed and it proved the perfect 2nd dessert for Thanksgiving along with Mom's pumpkin pie. I let my caramel syrup get good and dark to give the cake and frosting more flavor. I also halved the frosting recipe and had plenty.
This recipe is from Shuna Fish Lydon and you can find it here on her blog: Click me! This month's challenge is hosted by Dolores at Culinary Curiosity, Alex at Blondie and Brownie, Jenny from Foray into Food, and alternative baking help from Natalie at Gluten a Go-Go.

CARAMEL CAKE WITH CARAMELIZED BUTTER FROSTING

10 Tablespoons unsalted butter at room temperature
1 1/4 Cups granulated sugar (or less, I used a little under 1 cup)
1/2 teaspoon kosher salt
1/3 Cup Caramel Syrup (see recipe below)
2 eggs, at room temperature
splash vanilla extract
2 Cups all-purpose flour
1/2 teaspoon baking powder
1 cup milk, at room temperature

Preheat oven to 350F

Butter one tall (2 – 2.5 inch deep) 9-inch cake pan or cupcake pans. In the bowl of a stand mixer fitted with a paddle attachment, cream butter until smooth. Add sugar and salt & cream until light and fluffy. Slowly pour room temperature caramel syrup into bowl. Scrape down bowl and increase speed. Add eggs/vanilla extract a little at a time, mixing well after each addition. Scrape down bowl again, beat mixture until light and uniform.

Sift flour and baking powder. Turn mixer to lowest speed, and add one third of the dry ingredients. When incorporated, add half of the milk, a little at a time. Add another third of the dry ingredients, then the other half of the milk and finish with the dry ingredients. {This is called the dry, wet, dry, wet, dry method in cake making. It is often employed when there is a high proportion of liquid in the batter.}

Take off mixer and by hand, use a spatula to do a few last folds, making sure batter is uniform. Turn batter into prepared cake pan. Place cake pan on cookie sheet or 1/2 sheet pan. Set first timer for 30 minutes, rotate pan and set timer for another 15-20 minutes. Your own oven will set the pace.

Bake until sides pull away from the pan and skewer inserted in middle comes out clean. Cool cake completely before icing it. Cake will keep for three days outside of the refrigerator.


CARAMEL SYRUP

2 cups sugar
1/2 cup water
1 cup water (for "stopping" the caramelization process)

In a small stainless steel saucepan, with tall sides, mix water and sugar until mixture feels like wet sand. Brush down any stray sugar crystals with wet pastry brush. Turn on heat to highest flame. Cook until smoking slightly: dark amber. When color is achieved, very carefully pour in one cup of water. Caramel will jump and sputter about! It is very dangerous, so have long sleeves on and be prepared to step back. (Wear oven mitts to protect your hands!) Whisk over medium heat until it has reduced slightly and feels sticky between two fingers. {Obviously wait for it to cool on a spoon before touching it.}

Note: For safety reasons, have ready a bowl of ice water to plunge your hands into if any caramel should land on your skin.

CARAMELIZED BUTTER FROSTING (I cut this in half and had plenty)

12 tablespoons unsalted butter
1 pound confectioner’s sugar, sifted
4-6 tablespoons heavy cream
2 teaspoons vanilla extract
2-4 tablespoons caramel syrup
Kosher or sea salt to taste

Cook butter until brown. Pour through a fine meshed sieve into a heatproof bowl, set aside to cool.Pour cooled brown butter into mixer bowl.
In a stand mixer fitted with a paddle or whisk attachment, add confectioner's sugar a little at a time. When mixture looks too chunky to take any more, add a bit of cream and or caramel syrup. Repeat until mixture looks smooth and all confectioner's sugar has been incorporated. Add salt to taste.Note: Caramelized butter frosting will keep in fridge for up to a month.To smooth out from cold, microwave a bit, then mix with paddle attachment until smooth and light.

(recipes above courtesy of Shuna Fish Lydon)
Related Posts with Thumbnails